| MMv4 KB |
| Introduction to Customer Fields | |
| Last Edited - 10/23/2013 8:35am PDT | |
| Category Path - Shopping Cart Software Components > Administration Area > Customers > FAQs & Tutorials | |
| Custom customer fields are a convenient way to create predefined options to collect specific types of information from all customers. When a customer places an order and enters a value for a customer field, that value is stored in the customer's account. Customer fields might be used to record a customer's selection of an option that applies to the customer's entire account, such as a company or department name, favorite color, or birthday.
example
The Poster Life store sells a wide variety of posters and fine art prints, and allows customers optionally to sign up to receive emailed announcements when new posters or prints are added to categories of interest. The store uses a customer field to collect the information about customers' categories of interest.
Create the customer field
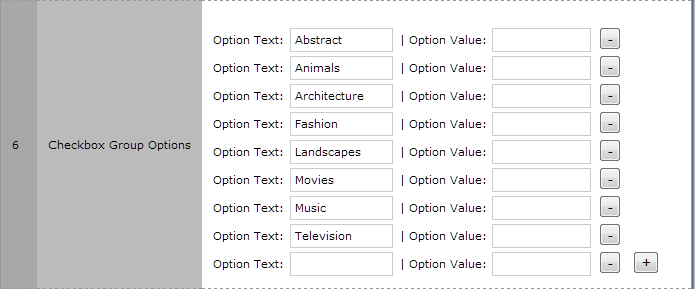
Let's go back to the example of a store that sells posters and allows customers to sign up to receive emailed announcements when new products are released for specified categories. In order to allow customers to select categories to receive notices of new releases, the store has created a customer field, following the steps below: Create a checkbox customer field:
recommended reading
The remaining options (Unique, Required, Strict, Encrypt, and Include in Email) are not directly relevant to this tutorial and so are not covered here. The following Knowledge Base article provides more detailed information about customer field options:
Customer Field Editor
Display the customer field at checkout
Once the customer field has been created, the next step is to display the new customer field on the checkout page, so that customers are able to make their selections as they place their orders.
key concept: active and internal only settings
Only customer fields with the Active option set to YES and the Internal Only option set to NO will display in the storefront. When reference is made to displaying "all" customer fields in the storefront, only customer fields with the Active option set to YES and the Internal Only option set to NO will actually display.
Of course, in the admin area, all customer fields may be accessed through the Search Customer Fields and Customer Field Editor pages, regardless of the Active and Internal Only settings. By default, the current stock template packages will display all active customer fields immediately below the Billing Information section of the checkout page. If the store is using a custom template package, or a very old stock template package, it may be necessary to manually edit the checkout template to add customer fields to the page. To quickly check whether or not the customer field is displayed at checkout, simply click the Storefront link at the top right corner of any of the store's admin area pages. This will load the storefront in a new browser window or tab. Most of the default template packages have a Checkout link or button easily accessible near the top of all storefront pages. If the customer field is already displayed on the checkout page, then this section of the tutorial may be skipped. If the new customer field is not displayed on the checkout page, but does have the Active toggle set to YES and the Internal Only toggle set to NO, then it will be necessary to edit the checkout template to add the customer field to the page.
recommended reading
This section of the tutorial involves several of the storefront design features of the Modular Merchant shopping cart, and reviewing the following Knowledge Base articles before proceeding is recommended:
QuickCode Tag QuickCode Block Tag Template Package Sandbox
tip: copy the template package before editing it
Before altering the store's live template package, it is recommended to copy the template package. This is discussed in detail in the following Knowledge Base article:
Copy a template package Select the checkout template:
Edit the checkout template: There are three options for adding customer fields to the checkout template, and each option allows different levels of customization. The first option is to add all public, active customer fields, grouped together in a single location in the template, with a single QuickCode Tag. The advantage to this option is that it is extremely simple and requires the least amount of editing of the checkout template. The QuickCode Tag used for this option will automatically display all customer fields, so if additional customer fields are created later, they will automatically display at checkout along with the original customer fields. The disadvantage is that it also allows the least amount of customization. With this approach, the single QuickCode Tag will automatically display a list of all active customer fields. For each customer field, the field title will display first, then the field description (if there is one) on a new line, and finally the field input(s) on another new line. To use the first option, insert the following code into the checkout template at the desired location for the list of customer fields:
example code
{COMPOSITE-CUSTOMER-FIELDS}
example result
If the store has three customer fields, all three customer fields would be displayed in a list, as follows:
Customer Field 1 Title Customer Field 1 Description Customer Field 1 Option 1 Customer Field 1 Option 2 Customer Field 1 Option 3 Customer Field 2 Title Customer Field 2 Description Customer Field 2 Option 1 Customer Field 2 Option 2 Customer Field 2 Option 3 Customer Field 3 Title Customer Field 3 Description Customer Field 3 Option 1 Customer Field 3 Option 2 Customer Field 3 Option 3 The second option is to add all customer fields, grouped together in a single location in the template, with a set of QuickCode Tags and QuickCode Block Tags. The advantage to this option is that it is still fairly simple and only requires adding a single block of code to the checkout template. This option also allows more customization than the first option, including the ability to decide how customer field titles, descriptions, and input groups will be placed in relationship to each other, as well as apply formatting. The QuickCode Tags used for this option will automatically display all customer fields, so if additional customer fields are created later, they will automatically display at checkout along with the original customer fields. The disadvantage is that this option requires more code to be added to the checkout template than a single QuickCode Tag, and still does not allow each customer field to be placed at an individual location within the template. To use the second option, insert the {CUSTOMER-FIELD-BLOCK-BEGIN} and {CUSTOMER-FIELD-BLOCK-END} QuickCode Block Tags at the desired location for the list of customer fields. Then, between the QuickCode Block Tags, insert the customer field QuickCode Tags, as well as any other content, such as formatting, images, or text to repeat for each customer field:
example code
{CUSTOMER-FIELD-BLOCK-BEGIN}
<span style="font-weight:bold;">{CUSTOMER-FIELD-TITLE}</span> <span style="font-style:italic;">({CUSTOMER-FIELD-DESCRIPTION})</span><br /> <span style="color:navy;">{CUSTOMER-FIELD}</span><br /> <span style="color:gray;font-style:italic;">Please select one or more of the {CUSTOMER-FIELD-TITLE} options above.</span><br /><br /> <hr /> {CUSTOMER-FIELD-BLOCK-END}
example result
If the store has three customer fields, all three customer fields would be displayed together. In this example, style rules were included in the code block to format the customer field title as bold text, the customer field description as italic text, and to add a line of text after every set of customer field inputs, as follows:
Customer Field 1 Title (Customer Field 1 Description) Customer Field 1 Option 1 Customer Field 1 Option 2 Customer Field 1 Option 3 Please select one or more of the Customer Field 1 Title options above. Customer Field 2 Title (Customer Field 2 Description) Customer Field 2 Option 1 Customer Field 2 Option 2 Customer Field 2 Option 3 Please select one or more of the Customer Field 2 Title options above. Customer Field 3 Title (Customer Field 3 Description) Customer Field 3 Option 1 Customer Field 3 Option 2 Customer Field 3 Option 3 Please select one or more of the Customer Field 3 Title options above. The third option is to add each customer field to the checkout template individually, by adding a separate set of QuickCode Tags for each customer field. The advantage to this option is that allows full control over where each customer field is displayed on the page, and how each customer field it is formatted. The disadvantage is that this option requires the most code to be added to the checkout template. Also, since each customer field is added to the template individually, if new customer fields are created later, the checkout template will have to be manually updated to add the code to display the new customer fields. To use the third option, insert the customer field QuickCode Tags at the desired location for each customer field. With this option, the {CUSTOMER-FIELD-BLOCK-BEGIN} and {CUSTOMER-FIELD-BLOCK-END} QuickCode Block Tags are not used. Each set of customer field QuickCode Tags must include the SID number of the customer field, as follows:
example code
<div style="border: 2px solid orange;padding: 5px;width: 100%;">
<img alt="" src="required-field.png" style="float:left;margin:5px;width: 15%;" /> <div style="border-left: 2px solid orange;float:left;margin:7px;padding:7px;"> <span style="font-weight:bold;">{CUSTOMER-FIELD-TITLE:1}</span><br /> <span style="font-style:italic;">{CUSTOMER-FIELD-DESCRIPTION:1}</span><br /> <span style="color:maroon;">{CUSTOMER-FIELD:1}</span><br /> </div> <hr style="clear:both;" /> <span style="color:red;font-style:italic;">Please select one or more of the required {CUSTOMER-FIELD-TITLE:1} options above.</span> </div> <br /> <br /> <div style="border: 2px solid green;padding: 5px;width: 100%;"> <img alt="" src="optional-field.png" style="float: left;margin: 5px;width: 15%;" /> <div style="border-left: 2px solid green;float:left;margin:7px;padding:7px;width:35%;"> <span style="font-weight:bold;">{CUSTOMER-FIELD-TITLE:2}</span><br /> <span style="font-style:italic;">{CUSTOMER-FIELD-DESCRIPTION:2}</span><br /> <span style="color:navy;">{CUSTOMER-FIELD:2}</span><br /> </div> <div style="border-left: 2px solid green;float:left;margin:7px;padding:7px;width:35%;"> <span style="font-weight:bold;">{CUSTOMER-FIELD-TITLE:3}</span><br /> <span style="font-style:italic;">{CUSTOMER-FIELD-DESCRIPTION:3}</span><br /> <span style="color:navy;">{CUSTOMER-FIELD:3}</span> </div> <hr style="clear:both;" /> <span style="color:gray;font-style:italic;">Select as many options as you wish, or leave blank. {CUSTOMER-FIELD-TITLE:2} and {CUSTOMER-FIELD-TITLE:3} are not required.</span> </div>
example result
If the store has three customer fields, all three customer fields would be displayed together. In this example, extensive style rules were included in the code block to individually format the elements of each customer field, as well as adding details such as graphics, instructional text, and borders:

Customer Field 1 Title
Customer Field 1 Description Customer Field 1 Option 1 Customer Field 1 Option 2 Customer Field 1 Option 3 Please select one or more of the Customer Field 1 Title options above. 
Customer Field 2 Title
Customer Field 2 Description Customer Field 2 Option 1 Customer Field 2 Option 2 Customer Field 2 Option 3
Customer Field 3 Title
Customer Field 3 Description Customer Field 3 Option 1 Customer Field 3 Option 2 Customer Field 3 Option 3 Select as many options as you wish, or leave blank. Customer Field 2 Title and Customer Field 3 Title are not required.
View customer field selections in the Customer Editor
If the store has any active customer fields, the Custom Customer Fields section will be displayed in the Customer Editor, showing all of the store's active customer fields. Any customer fields set to inactive will not be shown. The Custom Customer Fields section will also display the customer's selections for each active customer field. Store admins may edit customer field values, even overwriting information previously entered by the customer. 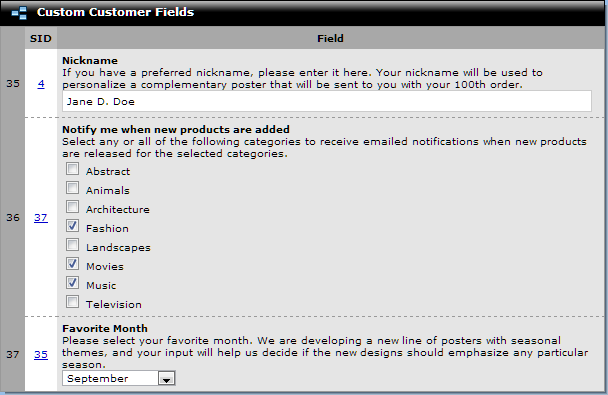
The Custom Customer Fields section of the Customer Editor displays all of the store's active customer
fields, and may be used to view and edit customers' field selections.
View and search for customer field selections on the Search Customers page
The Search Customers page includes options both to view customer field data, and to search for customers based on their customer field selections. To search for customers based on their customer field selections, in the Search Customers section title bar, choose Customers that match rules below from the dropdown menu, to display the Search Rules options. In the first Search Rules dropdown menu, select the name of the customer field to be used in the search. In the second dropdown menu, select how to compare customers' data to the search value. And in the text field, enter the search value. Additional search rules may be added by clicking the + button to the right of the search text field. If multiple rules are specified, choose whether customers should match all or any of the rules, then click Search.
example
To search for customers who included "Architecture" in their selections for the "Notify me when new products are added" customer field, enter the following search rule:
Notify me when new products are added (Customer Field) is Architecture To search for customers who included "Architecture" and "Landscapes" in their selections for the "Notify me when new products are added" customer field, enter the following search rules: Notify me when new products are added (Customer Field) is Architecture Notify me when new products are added (Customer Field) is Landscapes Find Customers matching all of the rules above, and display in the "Search Results" area below. To view customer field data, simply customize the Search Results table columns, to include the columns corresponding to the customer fields in question. The option to customize Search Results table columns is explained in detail in the Features of "Search" Pages in the Admin Area Knowledge Base article. 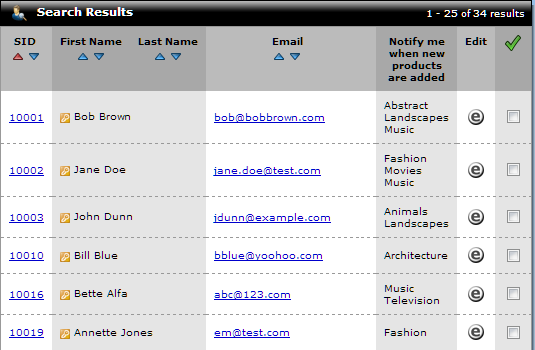 By adding the customer field column to the Search Results table, customer field data for multiple customers may be viewed at a glance.
Search for customer field selections on the Search Orders page
The Search Orders page includes options to search for orders based on customer field selections. To search for orders based on customer field selections, in the Search Orders section title bar, choose Orders that match rules below from the dropdown menu, to display the Search Rules options. In the first Search Rules dropdown menu, select the name of the customer field to be used in the search. In the second dropdown menu, select how to compare customers' data to the search value. And in the text field, enter the search value. Additional search rules may be added by clicking the + button to the right of the search text field. If multiple rules are specified, choose whether customers should match all or any of the rules, then click Search.
example
To search for orders placed by customers who included "Architecture" in their selections for the "Notify me when new products are added" customer field, enter the following search rule:
Notify me when new products are added (Customer Field) is Architecture To search for orders placed by customers who included "Architecture" and "Landscapes" in their selections for the "Notify me when new products are added" customer field, enter the following search rules: Notify me when new products are added (Customer Field) is Architecture Notify me when new products are added (Customer Field) is Landscapes Find Orders matching all of the rules above, and display in the "Search Results" area below.
tip: results are based on current customer field data
If a customer placed order SID 123 in January and selected "Architecture" from the "Notify me when new products are added" customer field, then order SID 123 would show up in the search results if the following search rule was entered:
Notify me when new products are added (Customer Field) is Architecture If the customer then placed order SID 456 in February and selected "Landscapes" from the "Notify me when new products are added" customer field, order SID 456 and order SID 123 would show up in the search results if the following search rule was entered: Notify me when new products are added (Customer Field) is Landscapes Order SID 123 would no longer show up in the search results when searching for "Architecture", because the customer changed the field selection and no longer has "Architecture" selected.
Create customer groups based on customer field selections
The Customer Group Editor includes options to create customer groups based on customer field selections. To create a customer group based on customer field selections, in the Add a Rule to this Customer Group section, choose Customer Account from the Rule Type dropdown menu. From the first Rule Details dropdown menu, select the name of the customer field to be used to create the group. In the second dropdown menu, select how to compare customers' data to the target value. And in the text field, enter the target value. To add additional group rules, after entering the first set of rule options, click Save Changes to finalize that rule. When the page reloads, the finalized rule will be displayed in the Customer Group Rules section, and the Add a Rule to this Customer Group section will contain options to add an additional rule, if desired. If the group contains multiple rules, be sure to check the How to apply rules below option, and select match ALL the rules below or match ANY of the rules below, as needed.
example
To create a customer group containing customers who included "Architecture" in their selections for the "Notify me when new products are added" customer field, enter the following rule options: Rule Type Customer Account Rule Details Notify me when new products are added (Customer Field) contains Architecture To create a customer group containing customers who included "Architecture" and "Landscapes" in their selections for the "Notify me when new products are added" customer field, enter the following rule options: How to apply rules below match ALL the rules below Rule Type Customer Account Rule Details Notify me when new products are added (Customer Field) contains Architecture Rule Type Customer Account Rule Details Notify me when new products are added (Customer Field) contains Landscapes |