| MMv4 KB |
| Adding a Company Name field to the storefront | |
| Last Edited - 06/11/2013 12:55pm PDT | |
| Category Path - Shopping Cart Software Components > Administration Area > Design > FAQs & Tutorials | |
question
Customers are usually purchasing our product for their business. Is it possible to add a field to the checkout and customer registration pages where customers can enter the name of their business? I would like, if possible, to place the field before the "First Name" field on both pages.
It is definitely possible to implement a "Business Name" field for customers, and is a request we receive quite often. A simple Customer Field may be used to allow customers to enter their business name on the customer registration page, or during the checkout process. Once the customer field has been created, the {CUSTOMER-FIELD} QuickCode Tag can be used to add the field in a specific location on the customer registration page or checkout page.
Creating the Business Name field
To create a customer field to collect business names: 1. In your Administration Area, go to [Customers > Add a Customer Field]. 2. At Step 1, Select the type of field this will be, select "Text Field". 3. For Field Title, enter a title for the field, such as "Business Name" or "Company Name". 4. Active should be set to "YES". 5. Required can be toggled between "YES" and "NO". If set to "YES", the field will be required when editing customer accounts in the admin area, and will also be required for customers to complete the field any time it is included in a storefront form. If set to "NO", the field will be optional, and may be left blank when editing customer accounts in the admin area, and customers may also leave the field blank when it is included in a storefront form. 6. Include in Email can be toggled between "YES" and "NO". If set to "YES", the field value will be included in any store emails with the {COMPOSITE-CUSTOMER-FIELDS} Quick Code Tag in the corresponding email template. If set to "NO", the field value will not be included in store emails, even if the {COMPOSITE-CUSTOMER-FIELDS} Quick Code Tag is in the corresponding email template. 7. Click Save Changes to this Customer Field.
Populating the template package
The very first thing that will need to be done, if it is not already, is to populate the template package with the checkout and customer registration templates. If the template package already contains checkout_1.tpl and customer_register.tpl, then this section may be skipped. Populating template packages can be done through the Template Package Sandbox: 1. In your Administration Area, locate [Design > Template Package Sandbox]. 2. Select the template package from the dropdown menu.
tip
The Template Package Sandbox also provides the option to Clone a template package, which may be used to create a backup copy of the template package. This can be done in case something goes wrong during the editing process, or you want to revert back to the package's original state later. In the Template Package Options row, click Clone. In the popup, type out a name for the backup package, then click the Clone button.
3. In the Template Package Options row, click the Populate Templates link.. 4. In the pop-up window, click Check All / Check None to deselect all checkboxes (it may be necessary to click twice). 5. The only templates we need to populate are the checkout_1.tpl and customer_register.tpl template. Select the checkbox for these templates, and click Populate Selected Templates.
Placing the field on the checkout page
The next step is to place the field in the desired location on the checkout page. In this example, we are going to put it right above the First Name row of the Billing Information section. This can be done using the {CUSTOMER-FIELD} QuickCode Tag: 1. In your Administration Area, go to [Design > Template Package Sandbox]. 2. Select the template package from the dropdown. 3. Under "Template Package Files", select "checkout_1.tpl" 4. If not viewing it already, switch to the WYSIWYG Editor, by clicking the white Switch to WYSYWIG Editor link in the top right of the Template Editor window. 5. In the WYSIWYG Editor, under Billing Information, locate the First Name row. 6. Right click in the First Name cell. In the menu that pops up, go to [Row > Insert Row Before]. 7. In the newly created Row, we will need to enter two things. The first, in the empty grey cell, insert Business Name or Company Name. 8. The second, is to enter the {CUSTOMER-FIELD:X} tag in the empty white cell. Replace "X" with the SID of the Customer Field. If the Customer Field SID is 123, then the tag would appear as {CUSTOMER-FIELD:123}. 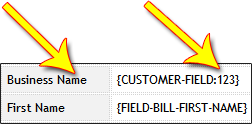
Replace "123" with the correct Customer Field SID number.
8. Under File Options, select Save and click Go.
optional
If the Business Name field is the only customer field being utilized on the checkout page, then it may be a good idea to remove one of two different things from the template, depending on what type of template package you are using.
Some template packages use the following table and 3 QuickCode Tags to display every active Customer Field. This table is located under the "Billing Information" section:
To remove this table, right click on the table and select Delete Table. This step should be taken to prevent an additional occurrence of the business name field. Other template packages simply use a single QuickCode Tag, located under the "Billing Information" section: {COMPOSITE-CUSTOMER-FIELDS} Simply highlight and delete this tag. This will prevent an additional occurrence of the business name field. Please note, that taking either of the above approaches will remove the ability for customer fields to automatically apply to the storefront. If this optional route is taken, it is also greatly encouraged to Clone the template package, as mentioned previously. This way, you can revert back to how the template used to appear if you wish.
Placing the field on the customer registration page
The final step, also involving the {CUSTOMER-FIELD} QuickCode Tag, is to place the field on the customer registration page. This can be done through the following steps: 1. In your Administration Area, locate [Design > Template Package Sandbox] 2. Select the template package from the dropdown. 3. Under "Template Package Files", select "customer_register.tpl" 4. In the WYSIWYG Editor, under Create a Customer Account, locate First Name. 5. Click immediately before First Name:, then hit enter twice to create two lines of blank space. 6. In the newly empty space above the First Name row, type out: Business Name: {CUSTOMER-FIELD:X} Replace "X" with the SID number of the customer field. 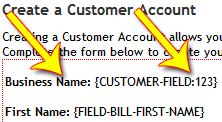 Replace "123" with the correct Customer Field SID number. 7. Under File Options, select Save and click Go. |