|
this article last updated: February 9, 2017 Due to inevitable changes that will be made to the shopping cart software over time, the cart's variable and database structure may change from time to time without advanced notice. We will attempt to keep the information in this article up-to-date, but Modular Merchant makes no guarantee as to the accuracy of the information provided in this article. Use this information at your own risk.
quote
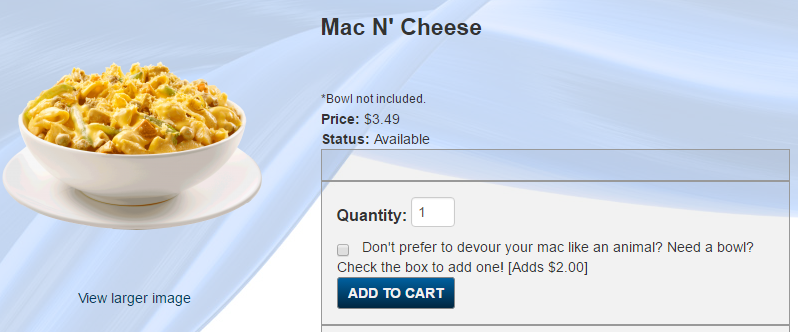
I want to create a checkbox on my "Mac N' Cheese" product page, which upon selection, simultaneously adds another product named "Empty Bowl". While the checkbox is selected, submitting the page should add both "Mac N' Cheese" AND "Empty Bowl".
It's possible to create a checkbox on a product's details page that adds additional products, using a mixture of JavaScript and Modular Merchant's quick links.
To do so, there are a few steps involved:
prerequisites
This article assumes the reader has familiarity with the following:
- HTML & JavaScript.
- Modular Merchant Quick Links.
- Template Package Sandbox.
use at your own risk
The following solution and its code sample are not supported by the Modular Merchant support team. Implementation of this code, or any revisions to said code, may potentially be performed as a paid programming project, but will not be troubleshot by the support team.
Creating and assigning a new product template
First, a new template should be created & assigned to the Mac N' Cheese product. The purpose of this is so that only the product page for Mac N' Cheese has the checkbox, rather than every product in the store.
-
Navigate to [Design > Template Package Sandbox].
-
Select a Template Package to Edit.
-
If product.tpl is not present under Template Package Files, click Populate Templates.
-
Select the checkbox for product.tpl.
-
Populate Selected Templates.
-
Under Template Package Files, select product.tpl.
-
Scroll down to File Options, select "Save as a copy..." and give the template a unique name. (Example: product_macncheese)
-
Save a Copy.
After creating the new template, it may be assigned to the Mac N' Cheese product:
-
Navigate to [Products > Search Products].
-
Open the product in the editor.
-
For option #14, Template, select the new template.
-
Save Changes.
If you would rather wait to apply the new template until after the code change has been made, that is perfectly acceptable.
Adding the checkbox and JavaScript
Once the new template has been created/assigned, we'll need to adjust it to add our checkbox and a bit of JavaScript.
1.) Navigate to [Design > Template Package Sandbox]
2.) Select the new template. (Example: product_macncheese.tpl)
3.) Viewing the editor in Plain Text mode, browse to where you would like to add the checkbox. (Example: Directly above the Add to Cart button.)
4.) Add the following code:
code
<!-- HTML Code -->
<label><input id="extra_prod" name="extra_prod" type="checkbox" value="yes" /> Don't prefer to devour your mac like an animal? Need a bowl? Check the box to add one! [Adds $2.00]</label>
<!-- JavaScript Code -->
<script type="text/javascript">
$('#extra_prod').on('change', function(){
if ($(this).is(':checked')) {
$('form').attr('action', 'https://www.mystore.com/quick_return.php?id1=123&qty1=1');
} else {
}
});
</script>
The lines in blue are HTML comments that can be removed, while the text in red should be changed to their correct values.
What's the code doing?
The HTML code is to create the checkbox and its selectable text, while the JavaScript code serves to modify the form action of the page when the checkbox is selected. The red link within the JavaScript code should be changed to the quick return link of your additional product (ex: Empty Bowl). To find that product's quick return link, navigate to [Products > Search Products], and click View Links for your product, or use the instructions from this article.
5.) Save Changes.
End result
The end result of adding this custom code is as follows:
-
If the checkbox is selected, the form action is changed to a quick return link that adds our Empty Bowl. Since we're submitting the form for our Mac N' Cheese product to the Empty Bowl quick link, both products are added.
-
If the checkbox is not selected, the form action remains the same as it was before. You get all the mac, but no bowl.
 How the box and text may appear if added directly above the Add to Cart button.
We hope this example helps add another tasty bite of goodness to your storefront.
|