| MMv4 KB |
| Creating Custom Templates Using the Template Package Sandbox | |
| Last Edited - 07/30/2013 9:50am PDT | |
| Category Path - Shopping Cart Software Components > Administration Area > Design | |
| Categories, products, and vendors have the option to use individual custom templates instead of the pre-assigned default templates. Custom templates may also be assigned to custom webpages. There are two methods for creating custom templates. Custom templates may be created offline, using a web design program such as Dreamweaver, and then uploaded to the store as part of a template package. Or, custom templates may be created from within the store's administration area, using the Template Package Sandbox. This article covers the Template Package Sandbox method of creating custom templates. Users who are comfortable with Dreamweaver or another web design program might prefer to use the offline method, since the sandbox in the store's administration area does not provide all of the tools that are included in a full-fledged web design program. However, the Template Package Sandbox method may be faster and simpler.
Select an existing template as a starting point
The Template Package Sandbox is located at [Design > Template Package Sandbox]. On the sandbox page, first select a template package from the dropdown menu. It is recommended to select the live template package at this step, and the default template for the intended store page. In order to assign a custom template to a specific store page, the custom template must be included in the live template package. Selecting the default template for the intended store page will provide a starting point that includes all of the typical options and layout for that type of store page. For instance, if the custom template will be applied to a specific product page, then at this step, select the live template package and the product.tpl file. Or if the custom template will be applied to a specific category page, then at this step, select the live template package and the category.tpl file. If the custom template will be applied to a custom webpage, or will be applied to multiple different types of store pages (such as a specific product and a specific category), then select the live template package and the universal.tpl file. After selecting a template package, the sandbox will automatically reload. Then, under Template Package Files, select the template file. The sandbox page will reload to display the selected template in the Template Editor. 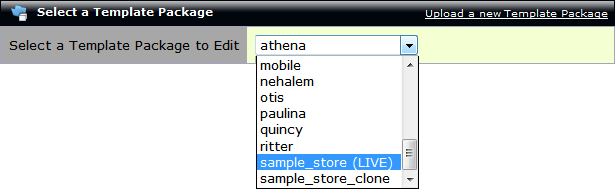 1. Select the LIVE template package from the dropdown menu. 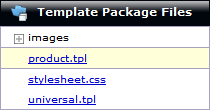
2. Select the desired template from the Template Package Files section.
Before making any changes to the template, scroll to the section titled File Options at the bottom of the page. Select Save as a copy... from the dropdown menu. In the new text field below, enter the name of the custom template.
custom template names
Template names may only contain letters, numbers, underscores, and hyphens. Spaces and other special characters are not allowed.
When a new template file is saved, all letters in the file name will be saved as lower-case, and the system will add .tpl to the end of the file name, so if FileName is entered in the text field, the result after saving would be filename.tpl.
tip
It is recommended to name the copy with a prefix of some sort. For example, if the copy is of a product template, it could be named as, "product_filename.tpl". This may help to identify the template later.
After entering the new template name in the New template name text field, click Go to save the new custom template. 
Select "Save as a copy..." and enter the new template name. Then click "Save a Copy".
Customize the template
Upon saving the copy, the Template Package Sandbox will reload. To edit the new template, select it from under the Template Package Files section. This will open it in the Template Editor window to the right. Once the desired changes have been made, scroll back down to the File Options section, select Save, and click Save Changes.
Apply the template
To apply the template to a specific category, open the category in the Category Editor. Locate the Template option. Select the new custom template from the dropdown menu, and click Save Changes. The category page for the specific category will now be displayed using the custom template instead of the default category.tpl.  To apply the template to a specific product, open the product in the Product Editor. In the Storefront Behavior section, locate the Template option. Select the new custom template from the dropdown menu, and click Save Changes. The product page for the specific product will now be displayed using the custom template instead of the default product.tpl.  To apply the template to a specific vendor, open the vendor in the Vendor Editor. Locate the Template option. Select the new custom template from the dropdown menu, and Save Changes. The vendor page for the specific vendor will now be displayed using the custom template instead of the default vendor.tpl.  To apply the template to a custom webpage, open the custom webpage in the Custom Webpage Editor. Locate the Template option. Select the new custom template from the dropdown menu, then scroll to the bottom of the page, select Save changes and click Go. The custom webpage will now be displayed using the custom template.  |