Products are the items that customers purchase in the storefront. Products can be tangible goods, services, downloadable files, subscriptions, etc. Anything that customers purchase in the store is considered a product.
The Product Editor is used to create new products for the store and to edit existing ones.
Creating a new product
-
Go to [Products > Search Products > +].
-
Configure the product.
-
Click Save Changes.
Editing an existing product
-
Go to [Products > Search Products].
-
Locate the product using the provided search tools.
-
Click either the SID number or the
 icon associated with the product. icon associated with the product.
-
Make the desired changes to the product.
-
Click Save Changes when finished.
Show/Hide sections of Product Editor options
On the Product Editor page, the various options are divided into categories. Each category is distinguished by a title bar that includes the category icon, the category name, and a link to move that category to the dock. When the link is clicked to dock a category, the options in that category are removed from display, and the category icon is added to a dock on the right side of the page.
To add a docked category back to the Product Editor page, simply locate and click on that category's icon in the dock on the right side of the page. Mousing over each icon in the dock will display a tooltip with the category name.
To hide a category, click the "Move to dock" link on the right of the title bar. The entire category of options will then be removed from the main Product Editor page, and only the icon will
be displayed in the dock on the right. Click the icon in the dock to return
the category to the main Product Editor page.
The dock settings are remembered per individual product. If options in certain categories are rarely used by a particular product, simply move each of those categories to the dock, then click on the "Save as Default" link at the bottom of the dock. Those dock settings will then be used when creating new products.
how options in hidden categories are handled
If an option is in one of the categories that is hidden in the dock on the right, then that option will simply be skipped when the Product Editor page is submitted.
For example, if I create a new product and the Product Editor dock settings I'm using hide the Vendor Options category, then the options to assign vendors and vendor royalties will be skipped, with the result that no vendor will be assigned and no vendor royalties will be set.
If I edit an existing product that does have a vendor and vendor royalties set, but the Product Editor dock settings I'm using still hide the Vendor Options category, then the vendor and vendor royalties that were already assigned will not be altered. Hiding a category will not delete any existing values for any options in the hidden category.
The remainder of this article describes the options that are visible in the Product Editor when none of the categories have been docked.
General Options
SID (System ID)
The SID (System ID) is a unique number that identifies the product to the system. This number is set by the software and cannot be changed.
Name (Required)
The name of the product that will be displayed in the storefront. Name is the only required field that must be included when creating products.
Price
The standard price that will be displayed for the product in the storefront.
Sale Price
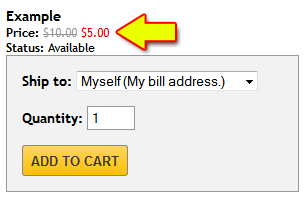
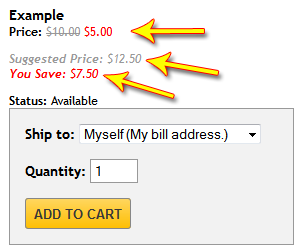
A Sale Price may be set, which will display the original price crossed out in the storefront, with the sale price alongside it in red font. Sale prices, among many other discounts and promotions (including Coupon Codes!) can be setup using the Event Engine.
When the Price is $10.00 and the Sale Price is $5.00.
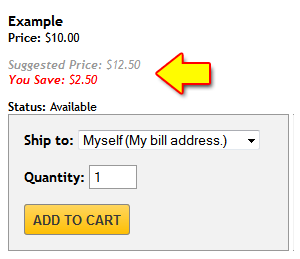
MSRP
Manufacturer's Specified Retail Price is used with various store reports. Input numbers and decimal points only. Don't enter a dollar sign or commas. Can be used to display how much the customer is saving between the set Price and MSRP in the storefront, by using the {PRODUCT-MSRP} and {PRODUCT-MSRP-SAVINGS} QuickCode Tags.
When the Price is $10.00 and the MSRP is $12.50.
tip
It is possible to use both the Sale Price and MSRP to really show your customers how awesome you are. If there is a set Sale Price and MSRP, and the {PRODUCT-MSRP} and {PRODUCT-MSRP-SAVINGS} QuickCode Tags are being used in your product.tpl template:
 Savings!
COGS
The Cost Of Goods Sold is used with various store reports. Input numbers and decimal points only. Don't enter a dollar sign or commas.
Price Suffix
Input the text, if any, you'd like to display to customers in the storefront related to the product's Subscription Rules. Any text entered in this field will be appended to the product's price anywhere it is displayed in the storefront.
example
A product without a Price Suffix would have its price displayed like this in the storefront:
$5.00
A product with a Price Suffix of "per month" would have its price displayed like this in the storefront:
$5.00 per month
Part Number
The product's SKU, inventory number, part number, etc. This can be any value you use for your own record keeping purposes.
Categories
Products can belong to any number of categories (including zero). This option provides a text field to enter the SID number of the category(ies) this product will be assigned to. The Search Categories tool may be used to locate specific categories and their SIDs.
A new category can also be created by entering its name in the Name of new category... field. If this field is used, then the category will be created and it will be added to the list of categories that the product is associated with.
reference
Categories created using this method can be further edited in the Category Editor.
Storefront Behavior
Display Order
This controls the order that products appear in the storefront. The lower the number, the higher the priority. Any products that share the same Display Order are then sorted alphabetically by their name. Any products that share the same Display Order and the same name are then sorted by their SID number, from highest to lowest.
Active
An active product will be available for customers to purchase in the storefront. Inactive products will not be displayed or be available for customers to purchase.
tip
Store admins can still place orders for Inactive products by using the Place an Order tool. This is a way to have private products that your customer's can't buy, but store Admins can include in orders that they place for customers.
Featured Product
Featured products will be listed within the FEATURED-PRODUCTS-BLOCK-BEGIN/END QuickCode Block Tags. By default, a list of Featured Products is included in the storefront home page's HTML template.
Hidden
Hidden products will not displayed in the storefront, category pages or search results. But they will still be available for purchase, either by store admins using the Place an Order tool, or by customers who either go directly to the product's storefront page, or that have an "add to cart" link for the product.
Include in search results?
Specifies whether the product will be included in the search results of the storefront's built-in search tool.
Search Keywords
Input a comma-separated list of keywords that will be referenced by the storefront's built-in search engine. The keywords entered in this field are never revealed to customers or displayed publicly in the storefront. Search keywords are not case-sensitive.
SEO-Friendly URL
This field is used to override the default URL of the storefront page for this product. The web address of the product's storefront page will take the text entered here and include it with the URL. If this field is left blank, then the product's name will be used to generate its SEO-Friendly URL.
example
If my excellent new product was inputted, the URL of the product page would become:
http://www.mystore.com/my-excellent-new-product-p123.php
Template
This indicates the template assigned to the product. By default, this will be assigned to the product.tpl template. (If that template isn't available, the product will default to the universal.tpl template.)
tip
Individual products, categories, and vendors can each use unique store templates.
For example, a custom-made template called digital_product.tpl could be created that contains only information relevant to downloadable products, and then applied to the digital products in a store.
reference
More info on the store's templates and the design features are available in the Design section of this Knowledge Base.
Alternate Storefront URL
The shopping cart software creates a page in the storefront for every product. If you'd prefer to use a product page that is hosted on a different website instead, then enter the URL of that other page in this field. All of that product's links in the storefront will automatically redirect to the URL entered in this field. Leave this field blank to use the storefront's default page for the product.
Link Target
Use the dropdown menu to select how storefront links to the product will behave.
Restricted Quantity Field
Select  to prevent customers from editing the product's Quantity field in their basket. to prevent customers from editing the product's Quantity field in their basket.
Minimum/Maximum Quantity
Used to set the minimum and/or maximum quantity that can be purchased at one time in the storefront. If the fields are set to 0 or are left blank, they will be ignored.
Allow Reviews
If the Product Reviews module is being used, and the option is toggled to  , then the product may be reviewed by customers. , then the product may be reviewed by customers.
Allow Wish Lists
If the Wish Lists module is being used, and the option is toggled to , then the product may be added to wish lists by customers.
Generate Gift Certificate
When toggled to , the purchase of this product will generate a gift certificate, equivalent to the vale of the product's purchase price.
Reward Points Options
By default, this option will be set to "Use the module's settings", which will cause customers to earn reward points equal to whatever is set in the Reward Points module upon purchase of the product.
A secondary option, is to "Override the module's settings...", which allows you to enter an amount of reward points that the customer will earn, either by per unit purchased, or by a % of the product's purchase price. This can be used to prevent reward points from being earned on the product altogether, as well as providing a greater number of reward points compared to other products.
Short Description
The short description is typically displayed on the storefront, category, vendor, and search results pages. HTML, Javascript, CSS, and PHP are all allowed (click the Source button to access the description's source code).
Long Description
The long description is typically displayed on product detail pages. HTML, Javascript, CSS, and PHP are all allowed (click the Source button to access the description's source code).
Vendor Options
Vendors
Products can be associated with any number of vendors (including zero). This option provides a text field to enter the SID number of the vendor(s) this product will be assigned to. The Search Vendors tool may be used to locate specific vendors and their SIDs.
A new vendor can also be created by entering its name in the Name of new vendor... field. If this field is used, then the vendor will be created and it will be added to the list of vendors that the product is associated with.
reference
Vendors created using this method can be further edited in the Vendor Editor.
Vendor Royalties
If a product has a Vendor Royalty, then that vendor will earn a commission each time a product that they're associated with is sold. If all of the vendors associated with the product earn the same royalty, select The same royalty is earned by all of this product's vendors...
To specify a different royalty for each vendor, select A different royalty is earned by each of the product's vendors... Either a fixed dollar amount or a percentage can be specified.
Shipping & Fees
Availability Status
Using the dropdown menu, select the availability status of the product. If it does not yet exist, input it in the Create a new product status by entering its name here section. The product status is typically displayed on the product details page.
availability status is for display purposes only
The availability status is only used by the store software to display a status to customers. It does not affect the actual availability of the product to customers in any way.
Inventory Control
Each physical product is comprised of at least one Inventory Object. The Inventory Object is the actual item that is boxed up and shipped out to the customer. Use this option to assign Inventory Objects to a product.
If inventory is not tracked for the product, select Inventory is NOT tracked for the product (It has infinite stock).
If the product's inventory is tracked for the product independently from other products, select This product has its own inventory and input the quantity available.
If the product shares inventory with another product, select This product shares inventory with one or more products and input the number of units.
reference
Inventory Objects can be used to create product bundles. They are explained in greater detail in the Inventory Object Editor article.
Low Stock Behavior
This option can be used to either automatically hide products from the storefront when their inventory level drops to a certain level, or to change the product status. If left blank, then this option will be ignored.
Requires Shipping
If is selected, the product will be included with shipping calculations, and the customer must select a ship method. If this option is activated, it will also display the remainder of the Shipping & Fees section of the Product Editor; which will be covered in detail below.
If  is selected, the product will be excluded when the shopping cart software determines whether the order requires shipping. If no products in the order require shipping, then the customer shipping address fields and selection of a shipping method will be excluded from the checkout process. If this option is not active, then the remainder of the Shipping & Fees section of the Product Editor will be hidden, as they are unnecessary. is selected, the product will be excluded when the shopping cart software determines whether the order requires shipping. If no products in the order require shipping, then the customer shipping address fields and selection of a shipping method will be excluded from the checkout process. If this option is not active, then the remainder of the Shipping & Fees section of the Product Editor will be hidden, as they are unnecessary.
Weight
The product's weight is used with the shipping calculations. The weight type (U.S. Standard or Metric) is specified in the Unit of measure section of the store's System Settings.
Product Dimensions
The Width, Length, and Height can be specified, which can be used in real time shipping rate calculations with FedEx, UPS, and USPS. The dimensions type (U.S. Standard or Metric) is specified in the Unit of measure section of the store's System Settings.
Ships Solo
If selected, this item will have its shipping rate calculated by itself rather than grouped with other products in the customer's basket. If the customer has other products in the basket that also require shipping, those shipping calculations will be performed separately.
Location this Product Ships From
If the product's shipping calculation is based on the company info inputted into the System Settings, select (Company Address entered in the System Settings). To view the editor for an existing dropshipper, select the dropshipper from the dropdown menu, then click [Show Editor]. If the product's shipping needs to be calculated from somewhere different, select Add a NEW dropship address and input the address in the provided fields to create a new dropshipper. If there are dropshippers present in the store, they will also be available for selection in the dropdown menu.
reference
Dropshippers can be created and edited, and are explained in further detail in the Dropshipper Editor.
This product may only be shipped by the following methods:
This option is used to restrict the product to certain ship methods. To not impose any ship method restrictions, select All active ship methods associated with drop shipper. To restrict certain ship methods, select Only the ship methods selected below... and select the shipping methods that the product is eligible to be shipped by.
Can be gift wrapped?
If gift wrapping is an option for the product, select and input the dollar amount. The Gift Wrap fee will be added to the order's total once for each unit of the product in the customer's basket.
Additional Shipping Fees
This option can be used to add additional fees, on top of whatever the default ship rate calculations are. The Additional Shipping Fee will be added each available shipping fee once for every unit of the product in the customer's basket.
Use the dropdown menu to select A different markup is applied to each shipping method to add varying amounts of additional shipping fees to the store's ship methods. Select One markup is applied to all ship methods to add the same amount of additional shipping fees to all ship methods. Leave blank to ignore.
Zone Fees
Use Zone Fees to add additional shipping fees for customers based on their shipping address.
reference
Images
Product Images
Click the Add images to this product link to open a popup window where images can be uploaded and selected. That tool includes a thumbnail generator and is explained in detail in the Select/Upload Images Knowledge Base entry.
Once one or more images is assigned to the product, the following options will be available:
View
Click the  icon to view the image. icon to view the image.
Display Order
Use the Display Order fields to specify the order that the images are displayed on the product's detail page. The lower the number, the higher the priority.
Image Path
Displays the path to the image.
Caption
An image caption can be inputted which will be displayed next to the image in the storefront. Typically, image captions will be displayed on the product's detail page.
Edit Date
Displays the most recent date the image has been edited.
File Size
Displays the image's file size, if available.

Click this checkbox to remove the image from the product, then click Save Changes. This will NOT actually delete the image from the store hosting account.
Correspondence
Order Memo
Content inserted into the Order Memo section will be displayed on the checkout receipt page, Order Editor page, and Order Receipt email when the product is purchased. Can be used to provide instructions on how to setup or use the product, leave a "Come see us again!" or "Thank you!" comment, etc. HTML, Javascript, CSS, and PHP are all allowed (click the Source button to access the description's source code).
Unsubscribe from Email Series
Used to enter a comma-separated list of Email Series SID numbers that the customer will be unsubscribed from when purchasing the product. Entering "all" will unsubscribe the customer from every Email Series.
Subscribe to Email Series
Used to enter a comma-serparated list of Email Series SID numbers that the customer will be subscribed to when purchasing the product.
Use Autoresponder Email?
If is selected, then a few additional options will become available, that allow you to customize an additional email that will be sent to the customer upon purchase of the product.
If  is selected, then there will be no additional emails sent to the customer upon purchasing the product. This will keep the remainder of the Correspondence section of the Product Editor hidden, as it is unnecessary. is selected, then there will be no additional emails sent to the customer upon purchasing the product. This will keep the remainder of the Correspondence section of the Product Editor hidden, as it is unnecessary.
Autoresponder Email Subject
Enter the subject (title) of the autoresponder email that will be sent to the customer upon puchase of the product.
Additional Recipients
Used to specify additional recipeints of the email, which will be sent a copy of the autoresponder email. If multiple email addresses will be entered, separate them with a comma.
example
josh@email.com, aidan@email.com, sally@email.com
Autoresponder Email Message
Displays a field to input the content that will be included in the autoresponder email customers receive when they purchase the product. HTML, Javascript, CSS, and PHP are all allowed (click the Source button to access the description's source code).
Included with this option, is the ability to send a test email. Simply enter an email address into the "Enter an email address..." field, then click Send Test Email.
Affiliate Marketing
Default Commission Value
The value inputted into this field will be the value that Affiliates earn from this product when customers travel through one of the Affiliate's Tracking ID Numbers, and purchase the product. The default commission value can be either a fixed amount, or a percentage of the product's price.
Maximum Commission
Use this option to set the maximum commission that an affiliate can earn for each unit of the product sold. If this field is left blank, then the commission's value will not be capped.
reference
Digital Delivery
reference
See the Digital Delivery module section of the knowledge base for more information about digital delivery and digital objects.
Upload Files & create Digital Objects
Click the Search button to open an upload window, where a file can be uploaded from your computer. Click the + button to upload more than one file simultaneously.
note
Although the Modular Merchant shopping cart software does not have a file size limit, files over 125mb cannot be uploaded using the administration area upload tool. Instead, you'll need to use FTP, then specify the URL manually.
Comma-separated list of this product's Digital Objects
Enter the SID number of an existing Digital Object into the field, or use the Search tool to locate and assign any existing digital objects.
Digital Objects assigned to this product
Displays the Digital Objects currently assigned to the product. Customers that purchase the product will have access to all Digital Objects assigned to the product.
Audio Samples
The Audio Samples options allows MP3 files to be uploaded and assigned to the product. By default, assigned MP3 files will be displayed in the SAMPLES tab on the product page, and may be streamed for free by any visitor. Store admins may also play the assigned MP3 files from the Product Editor using the controls in the Demo column.
Subscription Rules
Subscription Schedule
Use the Product's subscription term dropdown menu to select the type of Subscription Rule to be assigned to the product. The available options are:
NOT a subscription product
The store will not rebill the customer for this product. If selected, will hide the remaining Subscription Rules.
Every X days...
The store will rebill this customer again in the number of days specified.
Anniversary Date...
The store will rebill the customer on the weekly, monthly, or yearly date, based on the original purchase.
anniversary date example
If a monthly Anniversary Date was selected, and the customer bought the product on the 16th of the month, they will be rebilled again on the 16th of the following month.
X Day of Week/Month/Year...
Use this option to set a specific billing schedule that is scheduled independently of the date the product was purchased.
x day of the month example
If the 15th day of every 1 month was selected, and a customer bought the item on September 20th, they will be rebilled again on October 15th.
using a grace period
Use the Orders placed less than __ day(s) before the next bill date will be pushed to the next billing period option to set up a grace period.
Let's say the 15th day of every 1 month was selected and the grace period was 1 day. If a customer bought the item on September 14th, they will be rebilled again on September 15th, the very next day. If 2 days was selected, and the customer bought the item on September 14th, their next rebill will be on October 15th.
A Specific Date...
Set the rebill date to a specific date of your choosing, using MM/DD/YYYY format.
Rescheduling Options
Subscription products can be strung together in a chain. Every subscription product first repeats as itself a specified number of times (if any), and then switches to the next product in the subscription chain (if any).
The Rescheduling Options section is split into 3 sections, all of which will be explained below.
Section 1 of Rescheduling Options.
 Section 2 of Rescheduling Options.
Section 3 of Rescheduling Options.
Section 1:
The first section, is used to set whether the product will use its Subscription Schedule to reschedule as itself X number of times, or if it will be deleted on its due date.
If the option to reschedule subscriptions for this product X times is used, the subscription will used the product's Subscription Schedule and any rules specified when the subscription is first created to rebill the product as itself.
example
If the product is set to reschedule subscriptions as itself 3 times, and the product bills at the 1st of every month:
1. Customer purchases the product in the storefront on October 23rd. Subscription item reschedules for the 1st time.
2. November 1st comes along, and the subscription is billed. Reschedules for the 2nd time.
3. December 1st comes along, and the subscription is billed. Reschedules for the 3rd and final time.
4. January 1st comes along, and the subscription is billed. The item does not reschedule as itself, and will follow the rules stated in the third section of the Rescheduling Options.
If the option to delete the subscription on its due date is used, then when a customer purchases the product, it will be applied to the customer's subscription for until its bill date comes along. This option will set the item to reschedule as itself 1 time by default. This way, the product will remain in the customer's subscription until it's first and only bill date.
Once it is time for the subscription item to be billed, it will be removed instead. This means that there will be no Order Editor record or Order Receipt generated.
example
The product is set to be deleted on its due date, and the product bills every 14 days:
1. Customer purchases the product in the storefront on March 10th.
2. The product will now appear in the customer's subscription, with a bill date of March 24th.
3. March 24th comes, and instead of being billed, it is deleted from the customer's subscription; resulting in no Order Editor record or Order Receipt.
Section 2:
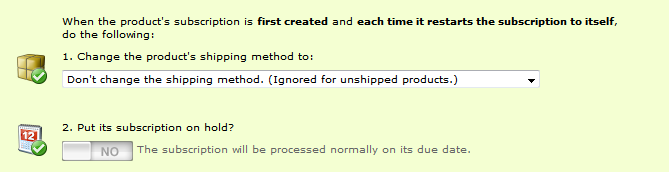
The second section is used to set whether or not the subscription will change its shipping method or be put on hold. These rule will be used when the product's subscription is first created and each time it restarts the subscription to itself (if any).
1. Change the product's shipping method to:
This option grants the ability to change the shipping method for the subscription when it is created. Can be used to keep the method the same, remove the shipping method, or change it to a new one.
example
The product is set to change the shipping method to a custom *FREE SHIPPING* method when the subscription is created. A customer purchases the product, and selects USPS Priority at checkout.
When the subscription is created, it will have the specified *FREE SHIPPING* method assigned to it.
2. Put its subscription on hold?
When set to , the subscription will be put on hold when it is first created and restarts as itself.
If the option is set to , then the subscription will be processed normally on its due date.
Section 3:
After the previous two sections have been setup, the third is used to specify what the subscription will do after it has been rescheduled X number of times. The options consist of:
-
Remove this product from the customer's subscription to discontinue all rebilling,
-
Restart the subscription to itself (A never-ending subscription.) to rebill the customer indefinitely, or
-
Switch to a subscription to a NEW product... to have the subscription switch to a different product.
tip
The Switch to a subscription to a NEW product... option can be used to set up a Daisy Chain where different products are rebilled every month (or other time frame).
For example, it can be used to bill a customer for product 1 on the 15th of the month, then product 2 on the 15th of the next month, product 3 the next month and so on. It can also be used to create a free trial product that migrates automatically to the regular product after a specified time, such as 30 days. The following KB article explains this process in detail: Sell a Product with a Free Trial Period.
Subscriber-Only Content
Content inputted in this section will be displayed to customers that are subscribed to the product in the My Account area of the storefront. HTML, CSS, Javascript, and PHP are all allowed (click the Source button to access the source code).
reference
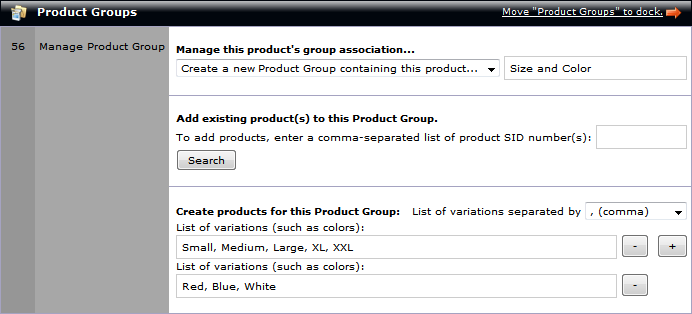
Product Groups
Product Groups are used to associate multiple similar products with one another to display different versions in the store using a dropdown menu. This can be useful for items like T-Shirts, where a product group can be used to create a different product for each size and color variation of the T-Shirt product.
key concept
A Product Group is an association of multiple products.
Manage Product Group
Use the dropdown menu to select This product is not in a Product Group if it is not in a product group. Select Create a new Product Group containing this product...to create a new product group. If there is already one ore more Product Groups present in the store, the option This product is in the Product Group... will be available.
If Create a new Product Group containing this product... is selected, a text field for the name of the Product Group will be displayed. The Product Group name will be viewable by customers in the storefront.
Add existing product(s) to this Product Group
Input the SID numbers of products you'd like to add to the Product Group. If the SID numbers are not known, click the Search button and input the name of the product(s). Separate each product SID with a comma.
If products for the Product Group do not yet exist, use the Create products for this Product Group section. Input the name of the product variations. One new product for each variation will be created. For each version inputted, a child product will be created, which is essentially a clone of the current product.
example
If a product named T-Shirt was being sold and you'd like to create versions for the size, input Small, Medium, Large. When the Product Editor is saved, three new products will be created:
-
T-Shirt: Small
-
T-Shirt: Medium
-
T-Shirt: Large
Each of these products can then be edited to be customized as needed.
tip
Since each product created for the Product Group will be a clone of the current product, configure the parent product as much as possible prior to creating the Product Group. Once the products for the Product Group have been created, they can be edited individually, each with their own images, price, description, etc.
The following example will create a total of 15 products (a product for each possible combination of size and color).
The Product Groups section of the Product Editor.
tip
Once the product has been assigned to a Product Group, some additional options will be made available to quickly configure the group:
Parent SID
The Parent of the Product Group is typically the one that is displayed in the storefront. The SID (System ID) is a unique number that identifies the parent to the system. This number is set by the software and cannot be changed.
about product group parent sids
The Parent SID of a Product Group cannot be purchased. If a customer attempts to add the Parent SID to their basket or view its storefront page, they will be redirected to the product page of the first non-parent product in the group, and asked to "select their desired version of the product."
Product Name
Displays the name of the product and provides a link to the Product Editor for the product.
Display Order
Use Display Order to control how the product group variations will be displayed to customers. The lower the number, the higher the priority.
Active
Active products will be available for purchase in the storefront and will be visible to customers. Inactive products will not be available for purchase, or be displayed to customers.
Featured
Featured products will be listed within the FEATURED-PRODUCTS-BLOCK-BEGIN/END QuickCode Block Tags. By default, a list of Featured Products is included in the storefront home page's HTML template.
Hidden
To prevent a product from appearing in the storefront, select Hidden. Hidden products will not be displayed in category, vendor, storefront, or other pages. They are still available for purchase if the customers used its "add to cart" link.
example
Suppose you were selling a T-shirt with the variations Small, Medium, Large, XL, and XXL. The parent product could be a featured product that is not hidden, but the rest of the variations products could be hidden and not featured. That way, the customer will only see the "parent" T-shirt product when casually browsing the store, rather than being bombarded with a list of every single variaton of the T-shirt that's available.
Include in Search
If the product is selected to be Included in Search, it will be eligible to be included with store search inquiries.
tip
It is also possible to create product variations by using Product Fields.
Product Attributes
key concept
Product Attributes are generally used to add various extra descriptions to products. Store administrators select the attribute from within the Product Editor.
Product Fields are generally used to allow customers to make a choice when adding the product to the basket.
If the default options for the product are insufficient, product attributes can be added to the product. If there are any product attributes already created in the backend, they can be assigned to the product here.
reference
Product Fields
Product fields are used to add variations of products to your store, such as different sizes, colors, etc. Product fields are useful for adding multiple product options all at once, rather than creating individual products in the store for each possible product variation.
reference
Serial Numbers
This product's Serial Numbers
The shopping cart software includes the ability to automatically distribute license keys or registration codes for individual products. The basic process is explained below:
-
Create a text file (.txt tab delimited) with one product license key/registration code per line.
-
Open the selected product in the Product Editor in your store's administration area.
-
Use the Serial Numbers upload tool to upload the codes to your store database.
-
The customer automatically receives a key code for each unit of the product they purchase.
-
Track the distribution of the keys assigned to the product as sales are made.
Serial numbers will be automatically displayed to customers on the receipt page and be included with the receipt email.
reference
Notes
Notes are hidden and displayed to store administrators only. May be used to help keep track of product alterations, upcoming changes that will need to be performed, leave witty messages for other admins to admire, etc.
|