This tutorial will walk through the process of using the Modular Mailer bulk-email module to send an email batch to a group of customers.
Step 1: Select or create a group of customers
In order to send out a batch of emails, a list of those customers will be needed first. Customer Groups are used to create those lists of customers. Customer Groups can contains anywhere from 1 to all of your store's customers. If you have not yet created a Customer Group to use as the recipients of your email batch, an article that provides Customer Group examples is available to help get you started.
Continue to the next step after at least one Customer Group has been created.
Step 2: (Optional) Create the email message to send
Next, either select an existing Email Template that will be used for the correspondence, or create a new one.
If creating a new Email Template for this message, use the Email Template Editor located at [Design > Modular Mailer (Bulk Email) > Email Templates > + ].
options when creating a new email template
When using the Email Template Editor to create a new email template for use with Modular Mailer, several options are available:
Subject: The subject of the email message.
From Name: The name that will be used as the sender's name.
From Email: The email address that the email address will be sent from.
BCC-To: Enter a comma-separated list of email addresses to which any instances of this email should be BCC (blind carbon copied) to.
Plain Text Version of Message: To include a plain text version of the email message, enter it here. The Plain Text version may not contain HTML code or Rich Text formatting.
HTML Version of Message: To include an HTML version of the email message, enter it here. Any images included in the HTML version should already uploaded and linked to using "global" URLs. ("Global" URLs are those that include the entire address, starting from "http://". For example: http://www.my-website.com/images/my-image.jpg)
Attachments: Digital Objects may be used as attachments to Modular Mailer emails. A new attachment may also be uploaded here. Files uploaded here as email attachments will also be listed as Digital Objects in other sections of your Administration Area.
Active: Whether or not the email template is active. Email messages using an inactive template will not be delivered!
Track Links / Clicks: If selected, tracking code will be added to the links in the HTML version of the email message.
Track Message Opens / Reads: If selected, code will be added to the HTML version of the email message to attempt to record each time the email is viewed. Note: Some email programs block attempts to track email views. If blocked by the email program, the Modular Mailer system will not be able to record this information for that recipient.
In the Template Editor, enter the email message's information. This includes the From name and email address, and email addresses to be used for returns and error reporting. There is also a section for entering the email's Subject, and a Plain Text and/or HTML versions of the email message. Tracking and reporting options can also be selected. When all of these items have been completed, click the Save Changes button.
Step 3: Select the Email Template and Customer Groups to send it to
To send an email to a selection of customers, use the Send an Email Batch tool (pictured below) located at [Design > Modular Mailer (Bulk Email) > Send an Email Batch].
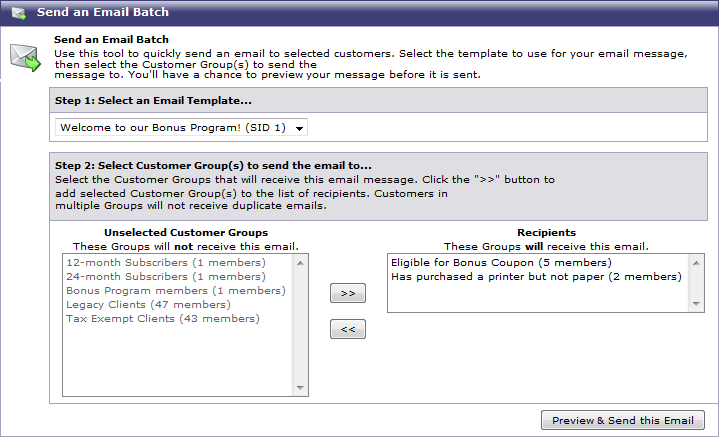 Use the Send an Email Batch tool to send messages to selected groups of customers.
The Send an Email Batch tool includes several menus. The first menu lists the available Email Templates. Select the desired email template to use for this message. In the sample image above, email template SID 1, titled "Welcome to our Bonus Program," is selected.
The next section of the tool includes two menus, side by side. The menu on the left, titled Unselected Customer Groups, will display all of the available Customer Groups in gray text. These are the Customer Groups that will not receive this email message. The menu on the right, titled Recipients, will display all of the selected Customer Groups in black text. These are the Customer Groups that will receive this email message.
selecting groups of customers
To add Customer Groups to the Recipients list, follow these steps:
1. Select one or more Customer Groups from the Unselected Customer Groups menu. (Hold the CTRL button to select multiple Customer Groups from this menu.)
2. Click the ">>" button to move the selected Customer Groups from the Unselected Customer Groups menu to the Recipients menu.
If necessary, use the "<<" button to move Customer Groups from the Recipients menu back to the Unselected Customer Groups menu.
Now that the email message has been written and the groups of recipients have been selected, it's time to send the message! Click the Preview & Send this Email button to continue to the delivery options.
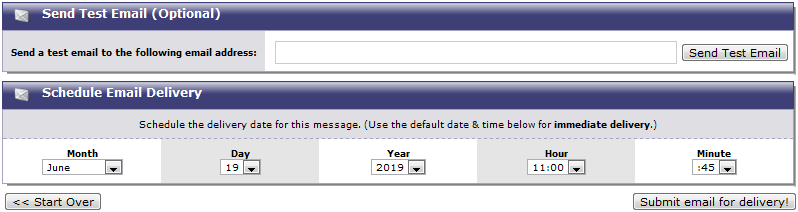
Step 4: Schedule the email delivery date and send it
Messages sent with the Modular Mailer module can be scheduled to be delivered either immediately or at a later date. A test email can also be sent to an address that you specify before sending the message to the selected customer groups. Following is a review of the email testing and scheduling options that are available:
Option 1: Send a Test Email
To double-check the email message before sending it to your selected customers, enter an email address in the Send a Test Email... field and click the Send Test Email button. A copy of the message will be sent to the specified email address immediately. No emails will yet be sent to the customers in the selected groups. The test email should be sent out within a matter of seconds. (Due to the nature of the Internet, it may take several minutes for the test email to arrive in your mailbox.)
tip: sending one-off emails
The Send a Test Email tool can be a handy way to quickly send an email to someone, since it bypasses the need for selecting a Customer Group.
Option 2: Schedule Email Delivery
To send the email to all of the customers in the selected Customer Groups, use the Month, Day, Year, Hour and Minute menus to select the desired delivery date.
tip: scheduling immediate delivery
By default, these menus will be set to the current time when the page is loaded. Thus, it is not necessary to make any changes to these menus in order to send an email message immediately.
After the desired delivery date has been selected, click the Submit Email For Delivery button. This button will schedule an email instance in the Email Delivery Queue for each customer in the selected Customer Groups. Customers that are included in more than one Customer Group will not be added to the Queue more than once for this email instance.
Step 5: Email delivery continues automatically
After the email instances have been added to the Email Delivery Queue, Modular Mailer will automatically start delivering the emails. The delivery software typically scans the Queue for due messages every 15 minutes, and delivers a batch of emails that are due for delivery. The number of emails delivered in each batch may vary; because servers often throttle the amount of resources given to email delivery, to keep the server running at its tip-top capacity.
|