| MMv4 KB |
| Create a Digital Product | |
| Last Edited - 11/23/2011 2:06pm PST | |
| Category Path - Shopping Cart Software Components > Administration Area > Modules > Digital Delivery > FAQs & Tutorials | |
| If you want to sell downloads such as (MP3s, PDFs, podcasts, or other files) or access to a "member's only" webpage, then this tutorial is for you. This article provides instructions on how to create a new Digital Product in your store. There are just two steps to follow when creating a new digital product:
Part 1. Add the product's Digital Object to your store.
This tutorial lists the steps to create a digital product that contains two Digital Object:
Creating a Digital Object that connects to a file... The PDF file in this tutorial will be a document instructing how to test a website's bandwidth consumption (riveting reading, I know). As with all files used as downloads in the shopping cart software, a "Digital Object" record must first be created for the file. To create the Digital Object open the Digital Object Editor in the store's Administration Area at: [Modules > Digital Delivery > Add a Digital Object] The Digital Object Editor has many options. For the purpose of this tutorial, we'll focus on the following ones:
digital object editor fields
Digital Object Name
Enter the name of the Digital Object, in this case, "Bandwidth Testing". This name can be anything you wish. It is not necessarily the file's name. It is the title the customer will see in the store's Download Area. (We'll come back to the Download Area later in this tutorial.) Digital Object URL If the "Bandwidth Testing" PDF file was already uploaded to a web server, then enter its URL in this field. However, for this example, we'll assume that the PDF hasn't been uploaded to the internet yet. The file will need to be uploaded to a website before it will have a URL that can be entered into this field. To upload the PDF, select Upload a new file... from the dropdown menu in the Digital Object URL option. The text field to the right of the dropdown menu will change to a "browse" field. Click the Browse button to locate the file on your computer. Once the PDF file has been located, select it. This will paste the path to the PDF file on your computer into the Digital Object URL field and automatically close the "file browser" window. When the Digital Object Editor is saved, the PDF file will be uploaded from your computer up to website. It will be saved in the store's default File Storage Area. Shelf Life By default, each Digital Object will be accessible for the period of time established in the Shelf Life setting in the module's options. However, those default values can be overridden for each Digital Object. For example, my module's global Shelf Life option is set to 24 hours and 3 download attempts. To make the PDF accessible for 72 hours and 10 download attempts, enter 72 in the hours field and 10 in the access attempts field. Changing these values for this Digital Object will not affect any other Digital Objects. Instructions Any special instructions that need to be communicated to the customer before they download the file — such as the fact that Adobe's free Acrobat Reader software is required to open PDF files — should be recorded in the Instructions field. The contents of the Instructions field will be displayed on the store's Download Area next to the name of this file. (We will see an example of this later in this tutorial.) After entering the desired settings, add the Digital Object to the store records by clicking the Save Changes button. Creating a Digital Object that accesses a webpage... Even though this second Digital Object is actually access to a website, the same steps for apply as for when creating the Digital Object for the PDF file — with the exception of the Digital Object URL. When creating a Digital Object that is access to a webpage, enter the page's complete web address (URL) in the Digital Object URL field.
webpage digital objects
For example, to create Digital Object that is access to a page named "secret_page.html" on the ModularMerchant.com website, enter its full URL, which would be:
http://www.modularmerchant.com/secret_page.html In the store's Download Area, the Download button for this Digital Object will automatically be replaced with a button titled Access Webpage. Clicking the Access Webpage button will load the http://www.modularmerchant.com/secret_page.html webpage in the customer's web browser. However, the webpage's URL will not be revealed to the customer. Instead, the URL displayed in the customer's web browser will remain that of the store's Download Area. The actual URL of the Digital Object's website remains a secret.
avoid broken content in secured webpages
To avoid broken images, CSS styles and links, a webpage that is used as a Digital Object must link to embedded content using global links. Refer this tutorial on using global links for more information.
Two Digital Objects have now been created, a PDF file and access to a website. The next step is to create a product that has both of these Digital Object assigned to it. This will allow customers to receive an Access Password to download these files when they purchase the product.
Part 2. Create a product, and assign Digital Objects to it
This tutorial assumes that the reader is already familiar with the basics of adding new products to their store. If you need to review the basics, refer to the Products section of this Knowledge Base. In the Product Editor page, set up the product as usual: give it a product name, price, etc. In the Digital Delivery section of the Product Editor, select the Digital Objects associated with the product. 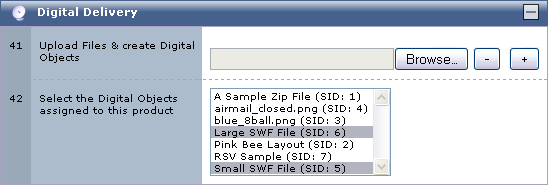 Attach Digital Objects to a product in the Product Editor. Hold the CTRL key and select multiple Digital Objects, or to deselect a previously selected one. After selecting the Digital Objects, click any of the Submit All buttons to add the new product to the store records. The product is now created and available in the storefront for customers to purchase and download!
Step 3. How the Customer Downloads the Files They Purchase
Digital products are purchased exactly the same way as "physical" products in your online store. After a customer purchases a digital product, they will receive download instructions on their store receipt webpage, and/or in their receipt email — depending how you have your store set up. These download access instructions in the receipt webpage and/or email may look similar to the following:
sample download instructions
HOW TO DOWNLOAD YOUR DIGITAL PRODUCT(S):
The digital product(s) associated with this order can be downloaded from our store's Download Area at: http://www.my-store.com/download/ You will need to use the password A65N4W7C1B1627204R to access the Download Area. This order's downloads expire on March 11, 2020. Customers will enter their password to log in to your store's Download Area. Once they have logged in, all of the Digital Objects associated with their order will be listed, with buttons to download each of them. (See the sample download area below.) 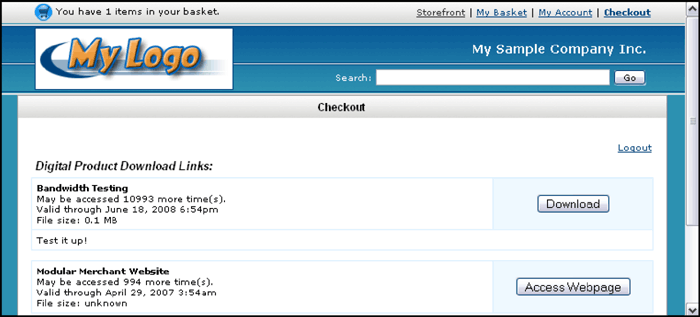 The customer simply clicks the Digital Object's Download button to start downloading it. The Download button is replaced by an Access Webpage button if the Digital Object is the URL of a webpage. Whether the Digital Object is a file or a website, its source web address (URL) is not revealed to the customer. All access attempts & download attempts are recorded, and can be reviewed on the Order Editor page. Following the steps in this tutorial, a variety of digital products can be added to an online store. Experiment, have fun, and happy e-commercing! |