|
trigger a checkbox when a specific product is purchased
We have workshops and we need the students to agree to our "Student Agreement Form" BEFORE they pay for the class. Is it possible to add a required agreement form to the checkout page that is only displayed when a customer is buying the class — and hide it when they're buying any other product?
Yes, this is possible to do, and it can be accomplished by following these instructions to edit the HTML template for the store's checkout page.
example
In this example, a required "Terms of Service Agreement" checkbox will be added to the store's checkout page if the customer purchases product SID 123.
Step 1: Publish your Terms of Service Agreement
Of course, if you're going to be requiring your customers to accept a Terms of Service Agreement, the very first thing you'll need is a copy of that agreement published on your website.
After a webpage containing your Terms of Service Agreement has been uploaded to your website, make note of that page's web address (URL). It will be needed in the next step.
Step 2: Add a link to the Terms of Service and the "I agree" checkbox to the checkout page's template.
Next, edit the checkout page's HTML template and add both a link to the Terms of Service Agreement and a required checkbox in the desired location.
example
The code to add to the template may look something like this:
{FIELD-TOS-CHECKBOX} I agree to the <a href="http://my-tos.com">Terms of Service agreement</a>.
That code would display a checkbox and a link that look something like this:
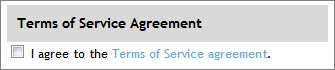
The {FIELD-TOS-CHECKBOX} QuickCode Tag is what displays the checkbox that the customer must select before they are able to complete their order. The checkbox generated by the QuickCode Tag will be required.
code placement
The code will need to be placed somewhere within the checkout form, in order for it to be a required field when submitting information at checkout.
The beginning of the form starts right after <!-- CHECKOUT SECTION TWO: SHIPPING INFO -->. The end of the form takes place after the {IF-PAY-WITH-COUPON-END} QuickCode Tag.
------------------------------------------------------------------------------------
<!-- CHECKOUT SECTION TWO: SHIPPING INFO -->
<form action="{THIS-PAGE}" id="checkout_form" method="post" name="checkout_form">
...
...
...
{IF-PAY-WITH-COUPON-END}</form>
------------------------------------------------------------------------------------
Step 3: Display the agreement only if product SID 123 is being purchased.
Lastly, instruct the shopping cart to only display the Terms of Service link if a specific product is in the customer's order. This can be done by wrapping the {IF-PRODUCT-IN-ORDER-BEGIN} and {IF-PRODUCT-IN-ORDER-END} QuickCode Tags around the link.
quickcode tag parameters
The {IF-PRODUCT-IN-ORDER-BEGIN} tag is special, because it can accept two additional parameters. The first tells the tag which product (or products) must be present in the order, and the second determines whether all of those products, or just one, must be present.
For example, to display the Terms of Service link when product SID 123 is present in the order, the QuickCode Tag would be set to this:
{IF-PRODUCT-IN-ORDER-BEGIN:123:all}
Putting it all together, the code to display the Terms of Service link only when the customer is buying product SID 123 would be:
example
if-product-in-order compatibility
The IF-PRODUCT-IN-ORDER-BEGIN/END QuickCode Tags can also be used in the shopping cart software's email templates.
This can be a useful way to add certain content to a customer's email receipt when they purchase specific products.
other parameters
The {IF-PRODUCT-IN-ORDER-BEGIN} tag can also accept a comma separated list of product SID numbers as its first parameter.
The second parameter can be set to either:
all (Meaning all of the listed product SIDs must be present in the order)
any (If any one of the listed product SIDs is present, then the encapsulated content will be displayed.)
For example, to display the Terms of Service Agreement if either product SIDs 123, 456, or 789 are purchased, the code would be:
{IF-PRODUCT-IN-ORDER-BEGIN:123,456,789:any}
{FIELD-TOS-CHECKBOX} I agree to the <a href="http://my-tos.com">Terms of Service agreement</a>.
{IF-PRODUCT-IN-ORDER-END}
Or, to display the Terms of Service Agreement only if both product SIDs 123 and 456 are purchased, the code would be:
{IF-PRODUCT-IN-ORDER-BEGIN:123,456:all}
{FIELD-TOS-CHECKBOX} I agree to the <a href="http://my-tos.com">Terms of Service agreement</a>.
{IF-PRODUCT-IN-ORDER-END}
|