Ahoy!
Dread Pirate Rutabaga here. This tutorial demonstrates how to configure Microsoft Outlook to send and receive email through your domain's hosting account.
Logging in to Plesk
Firstly, this tutorial assumes that you're using "Plesk" as the website management software for your website. You will create your email accounts from within your "Plesk" admin area. The Plesk login screen is shown in Figure 1.
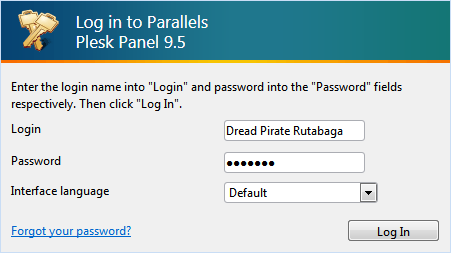
Figure 1: Plesk Login Screen
locating your plesk login information
Once a store's hosting account is set up, and the store is hosted under its domain or subdomain, a Plesk control panel becomes available.
Your account's Plesk login information, including your username, password, and a link to the Plesk control panel, can be found in your store's Administration Area at: [Hosting > Connection Information].
If you still cannot locate your Plesk login information, please contact Modular Merchant Tech Support.
Create your email accounts...
Now that you're logged in to Plesk, you can start creating your email accounts.
In this example, I will be creating the email account "captain@dreadpiraterutabaga.com"; so that I can keep in touch with my mates while I'm out at sea.
Once you're logged in to Plesk, follow these steps:
-
Click the link for the appropriate domain name at the bottom of the screen.
For my example, I will click on my domain name, "dreadpiraterutabaga.com".
-
On the next screen, click the "Mail" icon in the "Services" section of the page.
-
Click on the "Add New Mail Name" icon.
-
On the "Create mail name" screen use the following fields:
-
"Mail name": Enter the first part of the email address. Example: captain
-
"New password": Enter a password. Example: scurvy
-
"Confirm Password": Re-enter the same password to confirm.
-
Click the "OK" button.
Configuring your Outlook settings
Once your email account has been created, you can set up the email account in Outlook. To do so, follow these steps:
-
Go to Tools > Email Accounts. (This will open a popup window.)
-
Select "Add a new e-mail account". Click "Next".
-
Select "POP3". Click "Next". This will load the "POP3 Internet E-mail Settings" window. See Figure 2.
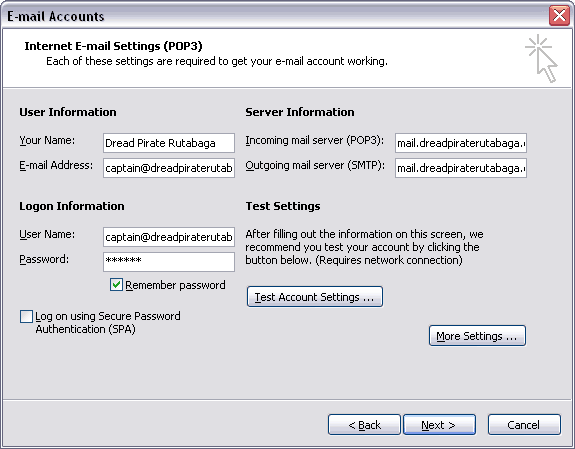
Figure 2: Outlook's POP3 Email Account Setup Settings
-
In the "Your Name" field, enter your moniker.
-
In the "E-mail Address" field, enter your complete email address.
-
In both the "Incoming mail server" and the "Outgoing mail server" fields, enter "mail.domain.com". (Be sure to replace "domain" with your actual domain name.)
domain vs. subdomain
If ye be hosting a subdomain, such as mysubdomain.mywebsite.com, then the address of your incoming and outgoing mails servers will be that of your subdomain.
For example:
The incoming and outgoing mail servers for www.mydomain.com would be: mail.mydomain.com.
The incoming and outgoing mail servers for mysubdomain.mydomain.com would be: mysubdomain.mydomain.com.
-
In the "User Name" field, enter your complete email address.
Note: The User Name is case sensitive. For example, if you create an email address in Plesk named "MyExampleEmail@example.com", then the User Name entered into Outlook will need to match its mixed upper and lower case.
-
In the "Password" field, enter the email password you entered when you created the email address in Plesk.
-
You're not done yet! Click the "More Settings" button. This will open another "Internet E-mail Settings" popup window.
-
Click on the "Outgoing Server" tab. Click the "My outgoing server (SMTP) requires authentication" checkbox. See Figure 3.
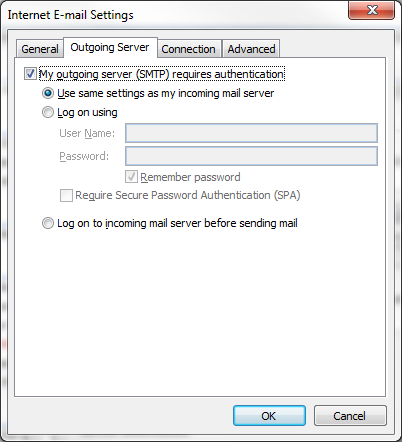
Figure 3: Outlook's Outgoing Server settings.
-
Next, click the Advanced tab. Set the incoming server to port 995, select the "this server requires an encrypted connection (SSL)" checkbox, set the outgoing server to port 25, and set the "use the following type of encrypted connection" option to Auto. See Figure 4.
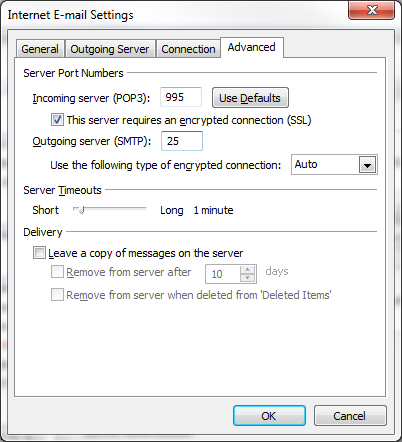
Figure 4: Outlook's Advanced settings tab.
-
Click the "OK" button. That second popup will close.
-
Back in the original popup window, click the "Next" button.
-
Click the "Finish" button.
SSL Popup
If, the first time you send or receive email, Outlook opens a popup window asking to accept the server's SSL certificate, select the "Yes" option. See Figure 5.

Figure 5: Outlook's SSL certificate confirmation popup message.
You're Ready To Set Sail!
Well there ye' go. No more messages in a bottle -- you're all set for electronic message correspondence! Let your messages go out like the evening tide. Good luck and smooth sailing.
|