Product Groups can be very useful if you'd like to create multiple versions of a product, and want the inventory, images, and other product information, to be tracked separately for each product.
Each product in a Product Group is a separate product. This means that one product in the group could be shipped, one could be digital, each could be a different weight, each could have different inventory levels, etc.
This tutorial will demonstrate the process for creating a Product Group that contains two versions of a book: a shipped print version, and a digital downloadable version.
key concept: a product group's parent product
This tutorial utilizes the concept of a Product Group's Parent Product. Familiarize yourself with how Product Groups use Parent Products before proceeding further.
Part 1: Create the Parent Product and the Group
-
Open the Product Editor to create the first product in the group. By default, the Product Editor is located at [Products > Add a Product].
-
In this tutorial, the "Parent" version of the product will be created first. This Parent Product will be neither the print nor digital version of the book. Instead, the Parent Product's storefront page will display a menu listing both the print and digital version. The customer will select their desired version from the menu, and will then purchase their selected product.
-
Complete all of the desired fields in the Product Editor, including the product's name, price, etc.
naming the products in the group
Since this is the parent version of the product, you may want the product's name to reflect this.
For example, if the name of the book is Another Robot, then the name of this product may be something like: Another Robot:
-
Since this is the parent version of the product, it is not necessary to set the options in either the Shipping & Fees or Digital Delivery sections. We will come back to these in a minute.
-
Expand the Product Groups section of the Product Editor. In the Manage this product's group association option, select "Create a new Product Group containing this product..."
In the text field to the right of the menu, replace the text ENTER PRODUCT GROUP NAME with the desired name of the Product Group. For this example, the Product Group will be named Another Robot Book Group.
-
Still in the Product Groups section of the Editor, in the option titled Create products for this Product Group, enter the text Print version, Digital version
By entering a comma-separated list of words in this field, the system will automatically create an additional product based on each word in the list. The result is that when we click any of the Submit All buttons on the page, three products will be created:
-
The Parent Product Another Robot: will be created.
-
A second product will be created. It will have the exact same settings as the Parent Product, except that its name will be changed to: Another Robot: Print version.
-
The third product created will also have the exact same settings as the Parent Product, except its name will be changed to: Another Robot: Digital version.
-
Clicking any of the Submit All buttons on the page will:
-
Create the Parent Product, Another Robot:
-
Create an exact copy of the Parent Product, but with the name Another Robot: Print version
-
Create an exact copy of the Parent Product, but with the name Another Robot: Digital version
-
Create the Product Group titled Another Robot Book Group, and assign these three products to it, setting the group's Parent Product to: Another Robot:.
each product may belong to only one group
A product can only belong to one Product Group at a time. Editing a product that already belongs to a Product Group to change the group it belongs to will remove it from the group it previously belonged to.
Part 2: Configure the group's products
Now that the group and each of its products have been created, each one's settings need to be configured in order to get the desired behavior in the storefront. This can be accomplished with these steps:
-
Parent Product
Open the Parent Product in the Editor. The Product Groups section will now list all three products. Make the following changes to the list of products in the group. (See sample image below.)
Set the Parent Product to be Active, Featured and Included in Search.
This will affect the Parent Product in the following ways:
Active: The product will be functional in the storefront.
Featured (optional): The product will be included in lists of "Featured" products, such as the storefront's home page.
Include in Search: The product will be included in the results of searches performed in the storefront.
Set all other products in the group to be Active and Hidden.
This will affect those products in the following ways:
Active: The product will be functional in the storefront.
Hidden: The product will not be displayed in the storefront, unless the customer is taken directly to the product's page, either by a link or being redirected by the shopping cart software.
-
Make any other desired changes to the Parent Product. In this example, I will delete the colon at the end of the Parent Product's name.
-
Click any of the Submit All buttons to save the changes to the Parent Product.
-
Shipped Product
Open the shipped version of the product in the Editor.
-
Expand the Shipping & Fees section of the Editor and assign the desired shipping settings.
-
Make any other changes to the product, such as the price, part number, etc., and then click any of the Submit All buttons to save the changes to it.
-
Digital Version
Open the digital version of the product in the Editor.
-
Expand the Digital Delivery section of the Editor and assign the desired Digital Objects to the product.
-
Make any other changes to the product, such as the price, part number, etc., and then click any of the Submit All buttons to save the changes to it.
reference
More information on creating digital products can be found in the Digital Delivery section of this knowledge base.
The Results
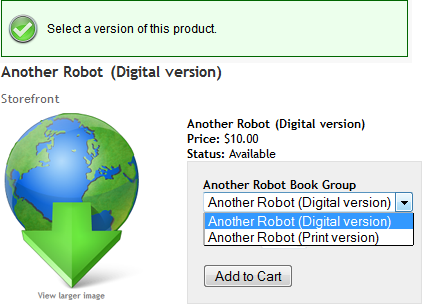
When customers browse the storefront, only the group's Parent Product, Another Robot, will be displayed and included in search results.
If the customer attempts to add the Another Robot Parent Product to their order, they will be redirected to the page for the first non-parent product in the group, and instructed to select a version of it. (See sample image below.)
Purchasing the print version of the product will trigger the shipping options during the checkout process, such as selecting a ship method, entering a shipping address, etc.
Purchasing the digital version of the product will skip the shipping options during the checkout process, but will trigger the digital delivery options, such as generating a Download Access Password for the customer to use when downloading the files.
|