Product Attributes are a convenient option for creating predefined descriptive information that might be displayed by a large number of products. Product Attribute information may be displayed in the storefront for customers to view. Customers will not be able to edit Product Attribute values. Product Attributes might be used to record a product's version number, return policy, or other product details.
For example, if a store sells posters of artwork by two different artists, a Product Attribute could be used to display the artist name in the storefront page for each product. By creating a Product Attribute, with each artist name as one of the attribute values, it would be possible to quickly pick one of the predefined attribute values for each product, instead of typing the artist name into each product description.
Product Attributes and Product Fields
key concept Attribute
An attribute simply displays text in the storefront that cannot be changed by customers.
Field
A field displays a field in the storefront that customers may edit.
Product Attributes and Product Fields are both custom options to store and collect information, and are particularly useful for information that may apply to a large number of products.
Product Attributes display predefined information to customers, and do not accept customer input. The information to be stored as a Product Attribute value is entered in the Administration Area, through the Product Editor.
Product Fields display predefined input options to accept information from customers. The information to be stored as a Product Field value is entered by the customer through the Product page in the storefront.
Both Product Attributes and Product Fields have very similar set-up and configuration options. The main difference between the Product Attribute Editor and the Product Field Editor is that the Product Attribute Editor does not have a setting to adjust the price of a product depending on the Product Attribute value, while the Product Field Editor does have a setting to adjust the price of a product depending on the Product Field value.
Using Product Attributes to add predefined information to product pages
Let's go back to the example of a store that sells posters with artwork by two different artists. A Product Attributes for the artist name could be added to each poster product by following these steps:
Create the Product Attribute that will record the information
-
Create a new Product Attribute at [Products > Search Product Attributes > + ].
-
On the Product Attribute Editor page, select "Dropdown Menu" from option 1. This will reload the page with more options.
-
After the additional options load, enter "Artist" as the title in option 2.
-
If desired, enter the Public Description and Display Order in options 3 and 4.
-
Enter the first artist name, "Picasso", in the Option Text field of option 5. If desired, enter a value to associate with the artist name in the Option Value field. If Option Value field is left blank, the system will re-use the Option Text as the Option Value.
-
Click on the + button to the right of the Option Value field to create another row of Option Text and Option Value fields.
-
Enter the second artist name, "Escher", in the second Option Text field.

-
If desired, enter a Default Value in option 6. In this example, the majority of the posters feature artwork by the artist Escher, so "Escher" will be entered as the Default Value.
-
If desired, adjust any of the remaining options. These options are covered in more detail in the Product Attribute Editor Knowledge Base article.
-
Click the "Add this Product Attribute" button at the bottom of the page to save the settings and create the new Product Attribute.
note Once the Product Attribute is created, make note of its SID (System ID) number. The SID number will be needed in a later step.
Assign the attribute to one or more products, and customize it for each one
-
Create a new product at [Products > Search Products > + ], or edit an existing product from the list at [Products > Search Products].
-
In the Product Editor, locate the section of options titled "Product Attributes".
-
Click the "Assign Attributes to this product" link to open a "Search Product Attributes" popup window.
-
In the "Search Product Attributes" popup window, enter the name of the product attribute (in this example: Artist).
-
The product attribute will be displayed in the "Search Results" table.
-
Click the "Select" button to the right of the product attribute.
-
If there are multiple product attributes to be assigned to the product, search for the next product attribute, and click its "Select" button.
-
After selecting each product attribute to be assigned to the product, click the "Close Window" button.
-
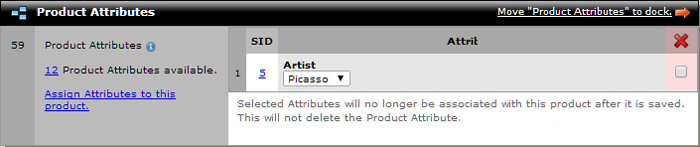
The selected product attribute(s) will now be displayed in the "Product Attributes" section.
-
Select the correct value from the attribute dropdown list.
-
Click the blue "Save Changes" button at the bottom of the page.
The result will be that the product's storefront page will now include a section titled "Artist", which will display one of three artist names. By default, the "Artist" title and value will be located in the "Additional Info" section of the product page.
The "Artist" attribute may be assigned to each product, and once the attribute has been assigned to the product, one of the three artist names may be assigned from the dropdown menu. Each product that has the attribute assigned to it will display the value of that attribute in the storefront.
Advanced: Using a specific Product Attribute to add custom keywords to each product
Create the Product Attribute that will store the custom keywords
-
Create a new Product Attribute at [Products > Search Product Attributes > + ].
-
On the Product Attribute Editor page, select "Text Field" from option 1. This will reload the page with more options.
-
After the additional options load, enter "Description Data" as the title in option 2.
-
Set the "Internal Only" option to "YES" (This will provide us with complete control over where the attribute data is displayed on the product's storefront page). Then click the "Add this Product Attribute" button at the bottom of the page to create the attribute.
note Once the Product Attribute is created, make note of its SID (System ID) number. The SID number will be needed in a later step.
Assign the attribute to one or more products, and customize it for each one
-
Create a new product at [Products > Search Products > + ], or edit an existing product from the list at [Products > Search Products].
-
In the Product Editor, locate the section of options titled "Product Attributes".
-
Click the "Assign Attributes to this product" link to open a "Search Product Attributes" popup window.
-
In the "Search Product Attributes" popup window, search for the "Description Data" attribute.
-
The product attribute will be displayed in the "Search Results" table.
-
Click the "Select" button to the right of the product attribute.
-
After selecting the "Description Data" product attribute, click the "Close Window" button.
-
The "Description Data" product attribute will now be displayed in the "Product Attributes" section.
-
Enter the desired description data in the text field for the attribute. In this example I'll enter "one, two, three".
-
Click the blue "Save Changes" button at the bottom of the page.
Add the Attribute's output to the product's storefront page
-
Locate the HTML template that controls the design of the product pages in the storefront at [Design > Template Package Sandbox].
-
On that page, load the "product.tpl" template into the editor.
-
Once the product page's template loads, click the "Source" button to switch to the template's HTML source code.
-
Locate the section of the source code to insert the description data. For example, in the head section of the template, I may add a "description" meta tag.
-
In the description meta tag, display that specific product's description content by adding the following QuickCode Tag: {PRODUCT-ATTRIBUTE-VALUE:X} Replace "X" with the SID number of the Product Attribute.
An example of what the meta tag may look like in the template's source code:
<meta name="description" content="{PRODUCT-ATTRIBUTE-VALUE:1}">
An example of what the meta tag may look like when the product's storefront page source code is viewed:
<meta name="description" content="one, two, three">
|