So, you've created your shopping cart account, and you're ready to get started setting it up your online store. It's shiny, new... and empty. If the thought of manually creating all of your store's records, settings and relationships strikes fear in your heart, then fear not, for Modular Merchant's Import/Export Center makes it possible to populate your store with thousands of products, customers, categories (and much more) quickly.
The Import/Export Center can be used to:
-
Add new records to your store database,
-
Update existing store database records, and
-
Download spreadsheets of your store data, which you can use for maintenance or when integrating with third parties.
Let's review how to use the shopping cart software's Import/Export Center, so that you can learn how to start using it with Deadly Efficiency™!
Where is the Import/Export Center located?
By default, the Import/Export Center is located in the following location in the shopping cart software's Administration Area: [Admin > Import/Export Center].
The Import/Export Center can be used to manage a variety of items in your store, including: categories, customers, digital objects, drop shippers, orders, products, shipments, subscriptions, taxes and vendors.
Importing and/or Exporting all of these items can all be done from the Import/Export Center page.
Exporting Data
The following examples will demonstrate exporting and importing several categories. (See Search Categories for related info.)
Desired Action
The first step is to configure the Import/Export Center to export the category data. This is done in the section of the page titled Select Desired Action. (See sample image below.)
 A variety of items can be both imported and exported from the Export Center.
To export categories, set the fields in this section to: I want to export categories. Click the Continue button to go to the next step.
The next section of the page contains several options for how the exported file should be formatted.
Data Export Preferences
The section of the page titled Data Export Preferences contains the options Data Delimiter and Data Format. In this tutorial, Data Delimiter will be set to tab, and Data Format will be set to CONDENSED: single row for each item.
key concept: data delimiter
The Data Delimiter is the character that is inserted between each field in the exported spreadsheet. The most common Data Delimiters are:
A) A comma. Used as the Data Delimiter in a .csv file, which stands for "Comma Separated Values".
B) A tab. This is usually what's used in spreadsheets with a .txt file extension.
It's recommend that tab be used as the Data Delimiter whenever possible. It not only reduces the frequency of formatting errors in spreadsheets (store data is much less likely to contain tabs than commas), but only tab-delimited files can be imported into Modular Merchant.
key concept: data format
Sometimes, it's possible for a spreadsheet item to be associated with more then one other item.
For example, a category can be associated with many products. When the category data is exported, a list of all of the products associated with each category will be listed in the Product SID field.
If the Data Format is set to "condensed", then all of the products associated with the category will be contained in a semicolon-separated list in a field in the spreadsheet, such as: 1;2;3
If the Data Format is set to "stacked", then each product associated with the category will be listed on a separate line on the spreadsheet.
Examples of both the "condensed" and "stacked" formatting are included in the article below.
Note: Only spreadsheets in the "condensed" format can be imported.
key concept: translate sid numbers
Many of the items that can be exported will be references to other items in a store.
For example, when exporting categories, it is possible to include a field titled Product Reference that contains a list of all of the products that are in that category. By default, the content of products in the Product Reference field will be a list of the product SID numbers.
However, since it is sometimes preferred for users to work with product names instead of SID numbers, the option to Translate SID numbers was added. Setting this option to "YES" will set the system to export item names instead of SID numbers whenever possible.
Any field that can be translated from SID number to text names during the export process can also be imported as the text names as well. During the import process, the text names will be translated back into the appropriate SID numbers when the data is saved back in the store database records.
Note: The "SID" field, which contains the items System ID number, will remain the number, regardless of this setting — the "SID" field will never be translated to the item's name.
Fields to Export
The section titled Select the fields to include in the export file... contains a list of all of the items that can potentially be included in the exported spreadsheet. Select the checkbox in the right-column to select which items to include in the exported spreadsheet. In this example, all of the available checkboxes are being selected.
Click the Save Preferences and Export Category button to continue to the next step.
Open or Save Export Spreadsheet
An option to open or save the exported data will then be displayed. In this example, the option to save exported tax.txt file is chosen, and then the saved file is opened with Excel. When opened in Excel, the spreadsheet exported in condensed Data Format will look something like the example below.
An example of an exported category spreadsheet, containing three categories, in condensed Data Format.
comparison: stacked data format
For those of you taking notes at home, you may remember that it was also mentioned that there are two options for the Data Format, "condensed" (example above) and "stacked" (example below). Tthe first thing you may notice about the "stacked" spreadsheet format is that it uses a lot more than just three rows to display the data for the three categories!
 An example of a spreadsheet containing the same three categories, in stacked Data Format.
This is because the "stacked" Data Format splits every semicolon-separated list into separate lines. This allows very complex data relationships to be included within a single spreadsheet. The "stacked" data format can be very useful when exporting orders, which may each contain multiple products, each of which will have its name, price, quantity, etc., included in a list.
Note: Only spreadsheets in the "condensed" format can be imported.
Updating Records with the Import System
Sure, the Modular Merchant shopping cart software includes a super-fantastic Administration Area where changes can be made to everything in a store. For example, the Category Editor can be used to edit each of the categories in a store one-by-one. But what if a store has five categories? Or five thousand? For goodness sake, isn't there a way to edit all of the categories at once? Yes, there certainly is.
It is possible to edit the spreadsheet of categories that was just downloaded, then import the updated categories into the store to save the changes. Using this method allows mass edits to be made to a large number of categories all at once. Let's try it out.
In this example, three edits are made to the store's existing categories:
-
Category SID 1: The image will be changed to "cats.png".
-
Category SID 1: The products associated with the category will be changed.
-
Category SID 2: The parent category will be changed to Category SID 1..
The image below shows an example of these changes.
 An example of the edited spreadsheet, with changes highlighted in red.
sid numbers vs. names
Notice that cells H2 and E3 in the example image above previously referenced the SID numbers of the products associated with the category and the category's "parent category", respectively. However, in the edited version, those SID number have been replaced with the product and category names.
In fields that reference categories, products and vendor SID number, it is allowed to use either their SID numbers or their names instead.
This little shortcut can save some headaches, since it is usually easier to remember a product's name than its SID number.
It is even possible to mix both SID numbers and text names within the same semicolon-separated list in a field!
After the changes have been made to the spreadsheet, save it as a tab delimited spreadsheet with a .txt file extension. The changes are now ready to be imported into the store.
Set the fields in the Select Desired Action section of the Import/Export Center page: I want to import categories. Click the Continue button to go to the next step.
The import process has four steps.
Step 1 of 4: Prepare the import file...
The first step of the import process provides tips on how to format the spreadsheet contents in order to get the desired results. A link to download an empty template is also included, in case you wanted to start working from a blank canvas.
Step 2 of 4: Upload the import file...
On the second step, use the Browse button to locate the spreadsheet file on your computer and select it. Then, click the Upload & Scan Data File button to upload the spreadsheet to the server. It may take several minutes to upload a large spreadsheet file.
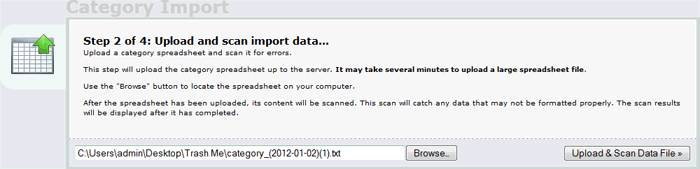 An example of the Upload the import file step's interface.
After the spreadsheet has been uploaded, its content will be scanned. This scan will catch any data that may not be formatted properly. The scan results will be displayed after it has completed.
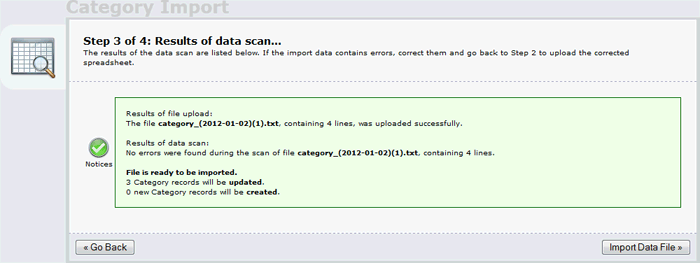
Step 3 of 4: Scan the import file...
The results of the file scan will be displayed on step three. If any problems were encountered when the spreadsheet format was scanned, then a list of error error messages will be displayed. Make any corrections needed, go back to step two, and try uploading the corrected spreadsheet.
An example of the Results of data scan step's interface.
If there's no errors, and the number of database records that will be updated and/or created looks correct, then click the Import File Data button to continue to the next step.
Step 4 of 4: Import the file data into the database.
On step four, the data from the spreadsheet will be converted into information that the shopping cart software can use, and will be recorded in the store database. This process may take a few minutes for large files. A progress bar will display the import's progress. Do not close the page until the import process has completed. Closing the page will cause the import to stop!
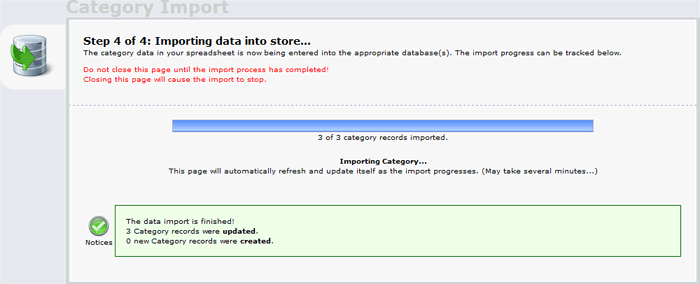 An example of the Importing data step's interface.
Once the progress bar has reached 100%, the import is done, and the imported items (in this case Categories) are ready to use.
Adding NEW Records with the Import System
Following the steps above, the import system has been used to make changes to a store's existing categories. But, what if someone wants to add one or more new categories? Using the import system to add content to a store is simple.
The determining factor on whether items are updated versus created during the import process is determined by the value of the SID field in the spreadsheet.
key concept: sid (system id) numbers
Everything in the store has a unique SID number: products, customers, orders, everything. The software assigns a SID number to each item when it is created. Each item's SID number is what the software uses to reference it. It cannot be changed.
When an item's SID number in the imported spreadsheet is not blank, then the item with that SID number will be edited. The item will be updated with the data in the spreadsheet with the matching SID number.
If the SID field in the spreadsheet is blank or zero, then a new item will be created.
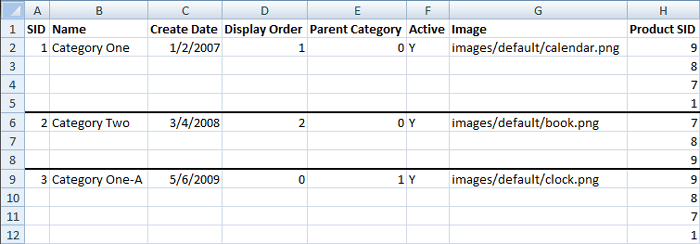
For example, if creating three new categories, then the import spreadsheet may be formatted like this:
 An example of a category spreadsheet with no SID numbers. As a result, three new categories will be created.
Note that the "SID" fields in this example (highlighted in yellow just to make them stand out) are blank. Since no SID numbers are present, importing this version of the spreadsheet will create two new categories instead of updating any existing ones.
Summary
The examples above demonstrate how the raw power of the Import/Export Center can be harnessed to control a store's contents. It can also provide a means to integrate the store's data with third-party software or services. Please use this new-found power responsibly. We're counting on you.
|