|
The Modular Merchant shopping cart's Facebook integration allows your store and Facebook to communicate with each other. The shopping cart's Facebook Integration module, located within your store's administration area at: [Modules > 3rd-Party Service Integration > Facebook Integration], provides an area to record the information that the store will need to use in order to communicate with Facebook. The module page also includes a quick-reference to other Facebook-related options available in the store.
Facebook App ID
In order for your store to communicate with Facebook, you will first need to create a free "Facebook App" within your Facebook account on their website. Instructions on creating a Facebook App are available on Facebook's Developer's Website.
After you have created your Facebook App, enter its information into the appropriate fields in the Facebook Integration module page in your store's administration area. On Facebook's website, the App's information can be found on a page that looks something like the example below.
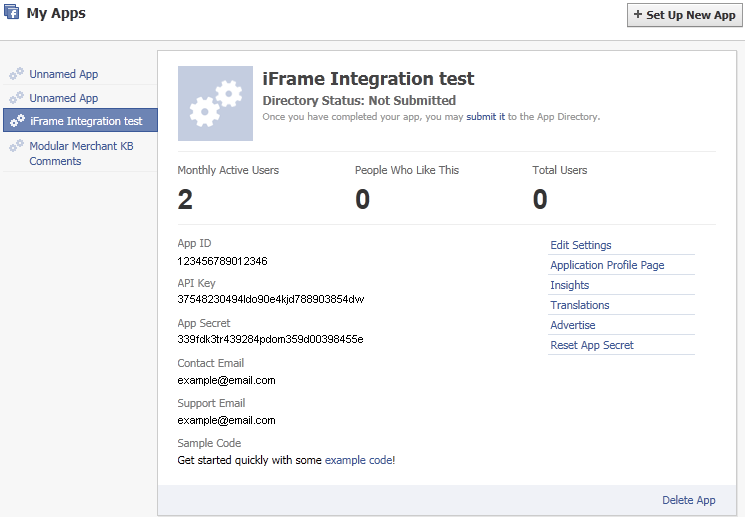
The Facebook page that lists your App ID, API Key and App Secret looks something like this.
After the Facebook App ID, API Key and App Secret ID have been entered into the appropriate fields in the Facebook Integration module page, click the Save Changes button. Once this info has been saved, your store is ready to start communicating with Facebook!
Facebook Template Package
In the field titled Facebook Template Package, select the set of templates that will be applied to your storefront when it is displayed in Facebook. If a Facebook Template Package isn't selected, then the one that is applied to your storefront will be used instead.
tip Facebook only provides an area 520 pixels wide to display your storefront on your Facebook page. Because of this limited width, it's recommended that you create a separate set of templates, optimized to fit in an area 520 pixels wide, to be used when your storefront is viewed on Facebook.
This technique will enable you to display your regularly designed storefront on your website, while simultaneously displaying a different version of your storefront -- optimized to fit within the allowed width -- to your customers on Facebook.
If you're ready to display your store on your Facebook page, read the tutorial on adding your shopping cart to your Facebook page.
Facebook QuickCode™ Tags
Another component of the shopping cart software's Facebook integration is the ability to add Facebook elements, such as "Like" buttons, to your storefront pages. This is a quick and easy way to allow your customers to share information about your store's products with their Facebook friends.
The following Facebook-related QuickCode Tags are available:
{FACEBOOK-COMMENTS}
Add this QuickCode Tag to any storefront template to display Facebook Comments. The comments interface will look something like this:
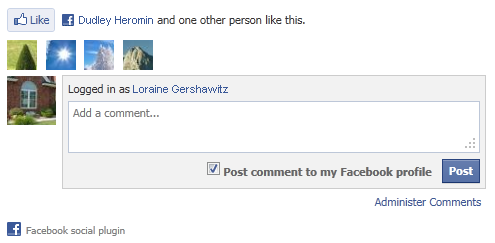
An example of the Facebook comments interface.
The QuickCode Tag can accept two optional parameters. The first controls the width of the comment area and the second determines the number of posts that are displayed. These parameters are optional, and can be set by including them in the QuickCode Tag. If these optional parameters are excluded, then the default values of 750 pixels wide and 10 recent posts will be used.
example To display a 500 pixel wide Facebook comment box that includes the ten most recent posts, format the QuickCode Tag like this: {FACEBOOK-COMMENTS:500,10}
{FACEBOOK-LIKE-BUTTON}
Adding a Facebook Like button to any page of your storefront is easy. Customizing its display is just as easy. This QuickCode Tag will add a Like button wherever you like. The content generated by the QuickCode Tag will look something like this:

The QuickCode Tag can accept three optional parameters. The first controls whether a Send button is also displayed. The second controls the width of the button and its content. The third determines whether the avatar images of the Facebook users are displayed.
example To display a Like button that includes a Share button, is 500 pixels wide, and does not include the Facebook avatar images, format the QuickCode Tag like this: {FACEBOOK-LIKE-BUTTON:true:500:false}
{FACEBOOK-SHARE-BUTTON}
This QuickCode Tag will add a Facebook Share button to the storefront page, allowing the user to send information about the web page to one of their Facebook friends. The Share button will open a new browser window containing Facebook's sharing interface, which looks something like this:
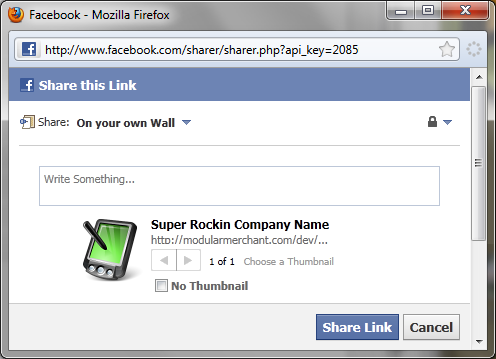
An example of the Facebook "share" window's interface.
This QuickCode Tag cannot accept any optional parameters.
|